
Build a Serverless Distance Calculator on AWS (Amplify, Lambda, API Gateway & DynamoDB)

TL;DR
Build a serverless distance calculator on AWS in one project! Learn Amplify, Lambda, API Gateway, IAM & DynamoDB.
AWS is the world’s leading cloud provider, and its cloud computing infrastructure has an 85% adoption rate in the enterprise segment. With its multitude of services, you can combine all the pieces to create an application that you could use in the real world.
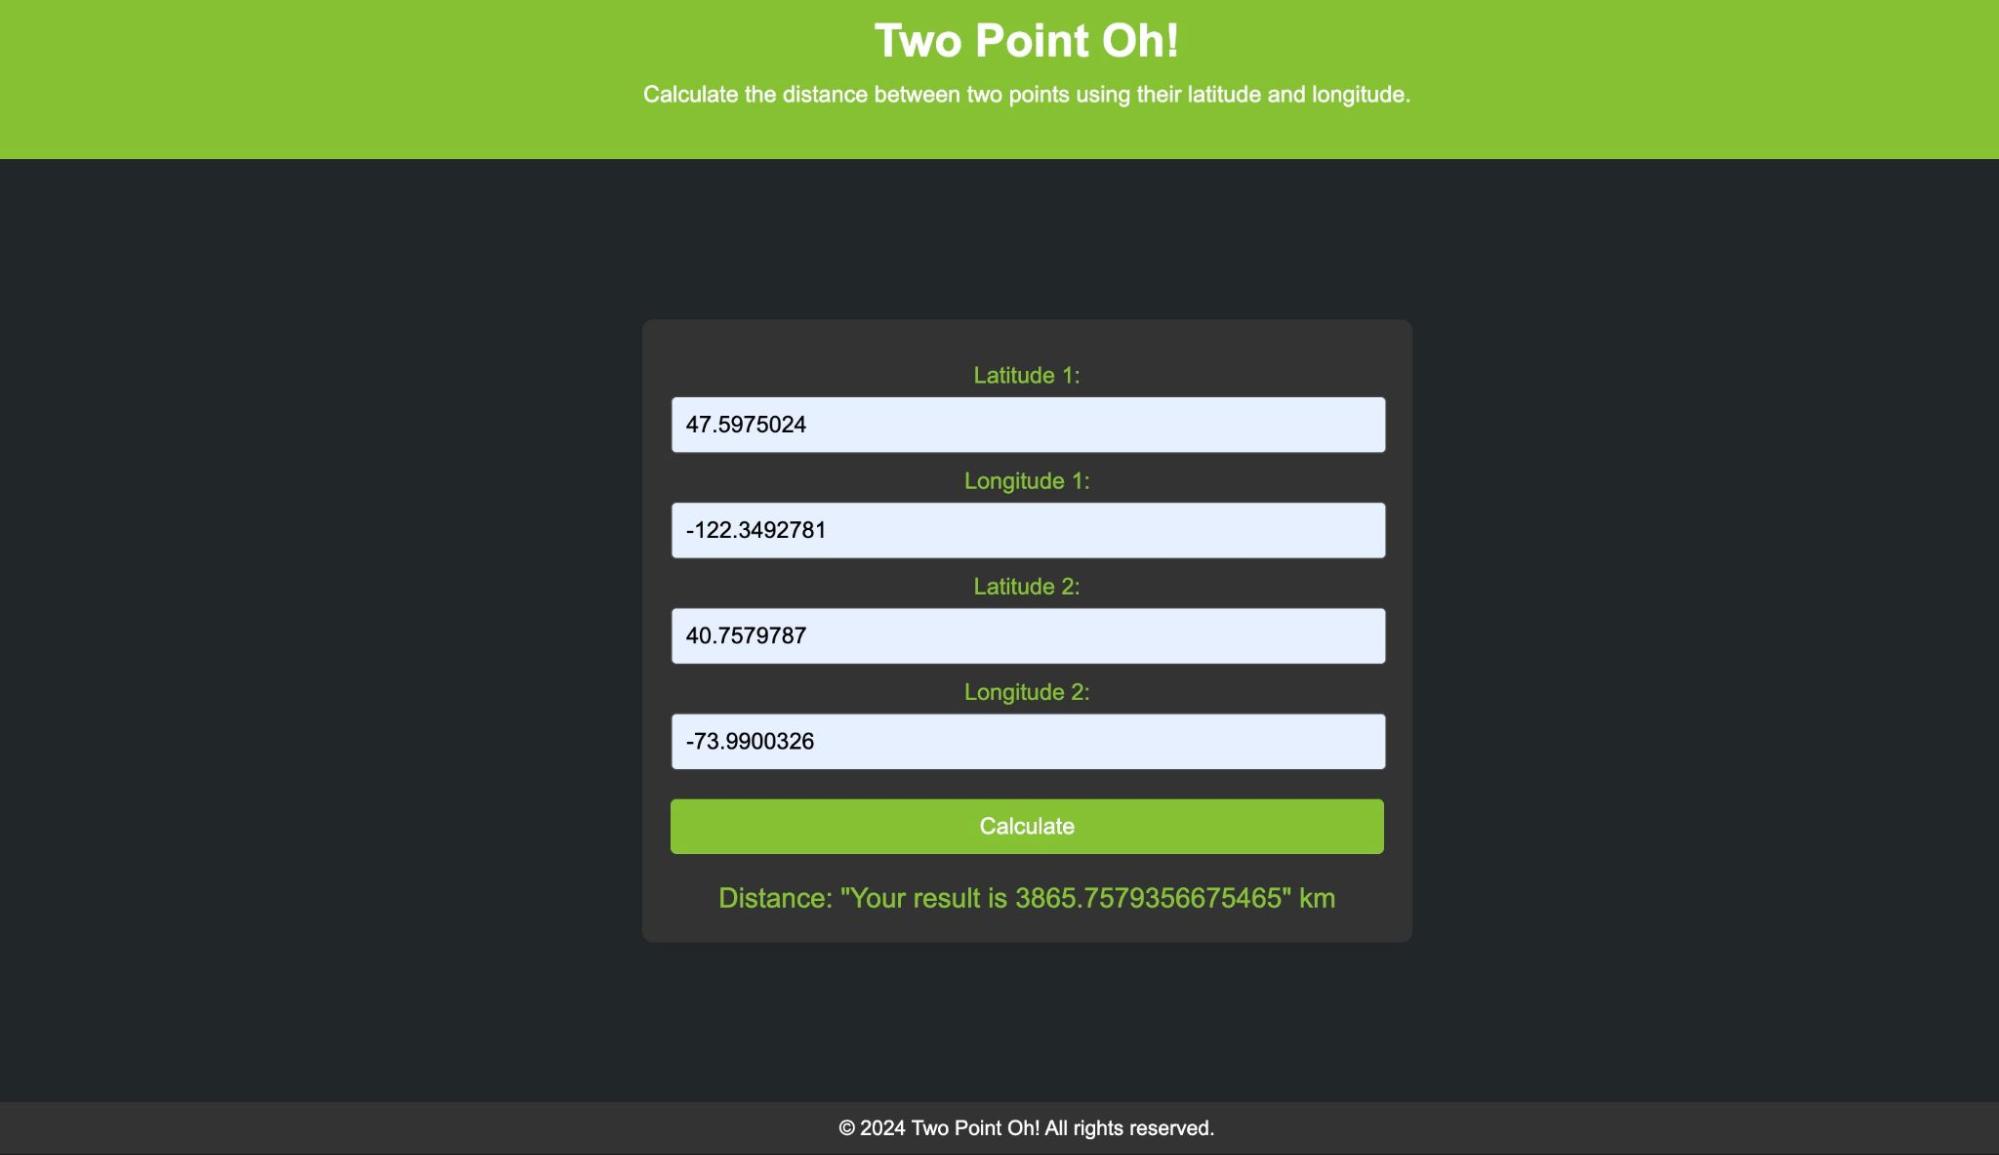
This project will show you how to design and build a web application from scratch with five AWS services, Amplify, Lambda, IAM, API Gateway, and DynamoDB. The concept behind this app is to calculate the distance in kilometers between two points using the latitude and longitude of a location.
Let’s get started!
Prerequisites
- Basic AWS knowledge
- Python
- HTML, CSS, and JavaScript
What is AWS Amplify?
AWS Amplify allows for the hosting and deployment of frontend applications which is crucial in the software development lifecycle of products. In this scenario, we will have to deploy our project to Amplify, similar to other deployment providers like Vercel, Netlify, Render, and so on.
Setting up of Web App
To deploy our web app to Amplify, create a new folder called TwoPointOh and within the directory, add an index.html file.
Copy and paste this code:
<!DOCTYPE html>
<html>
<head>
    <meta charset="UTF-8">
    <title>Two Point Oh!</title>
</head>

<body>
    Two Point Oh!
</body>
</html>
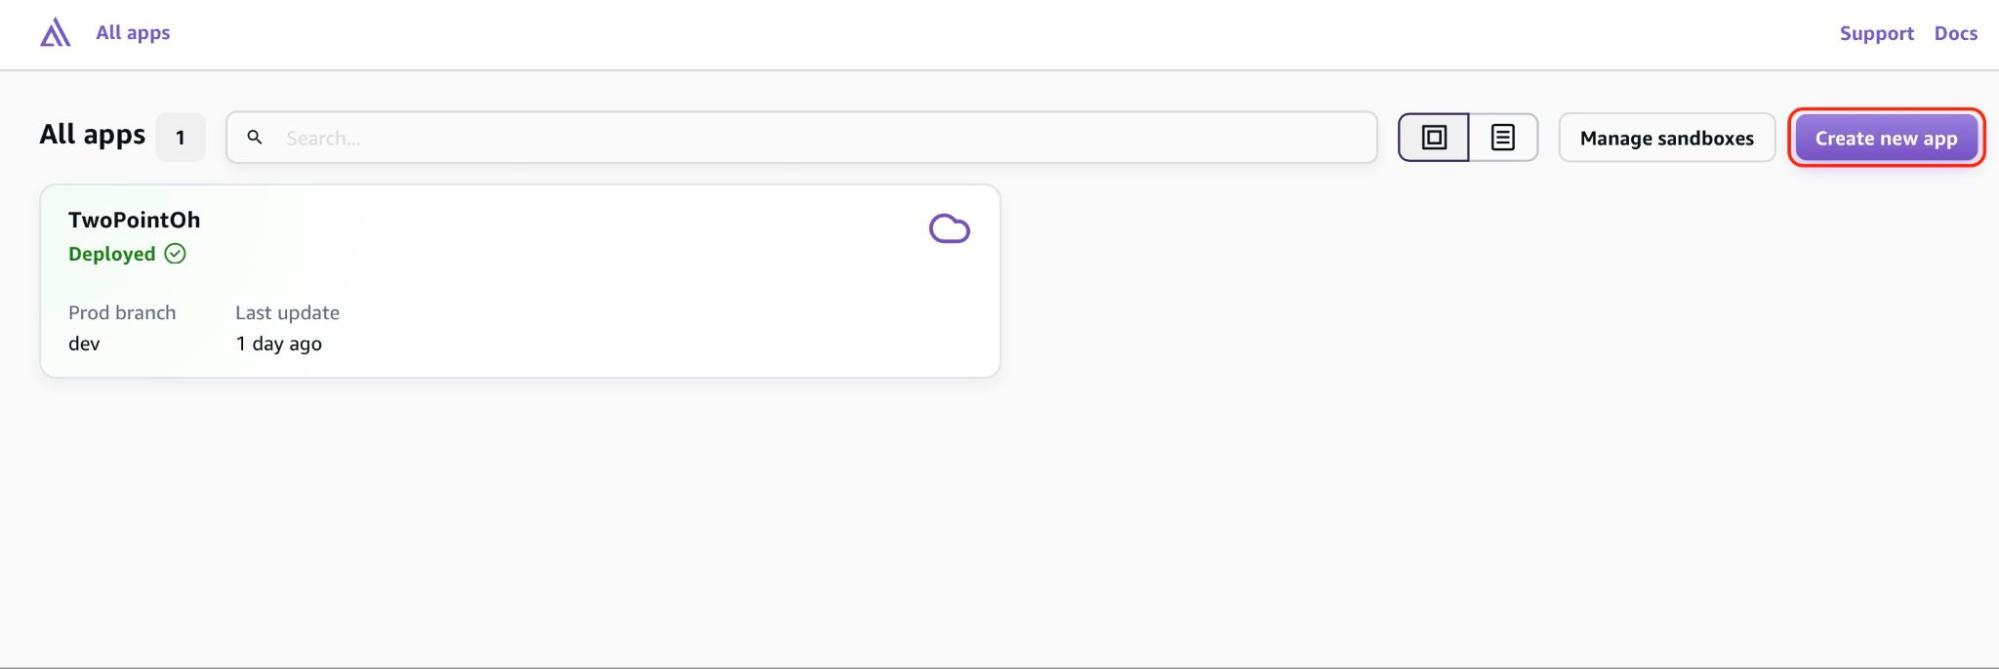
Now, let’s compress (zip) this file to deploy this app without git. Head over to your Amplify console and click on the create new app button.
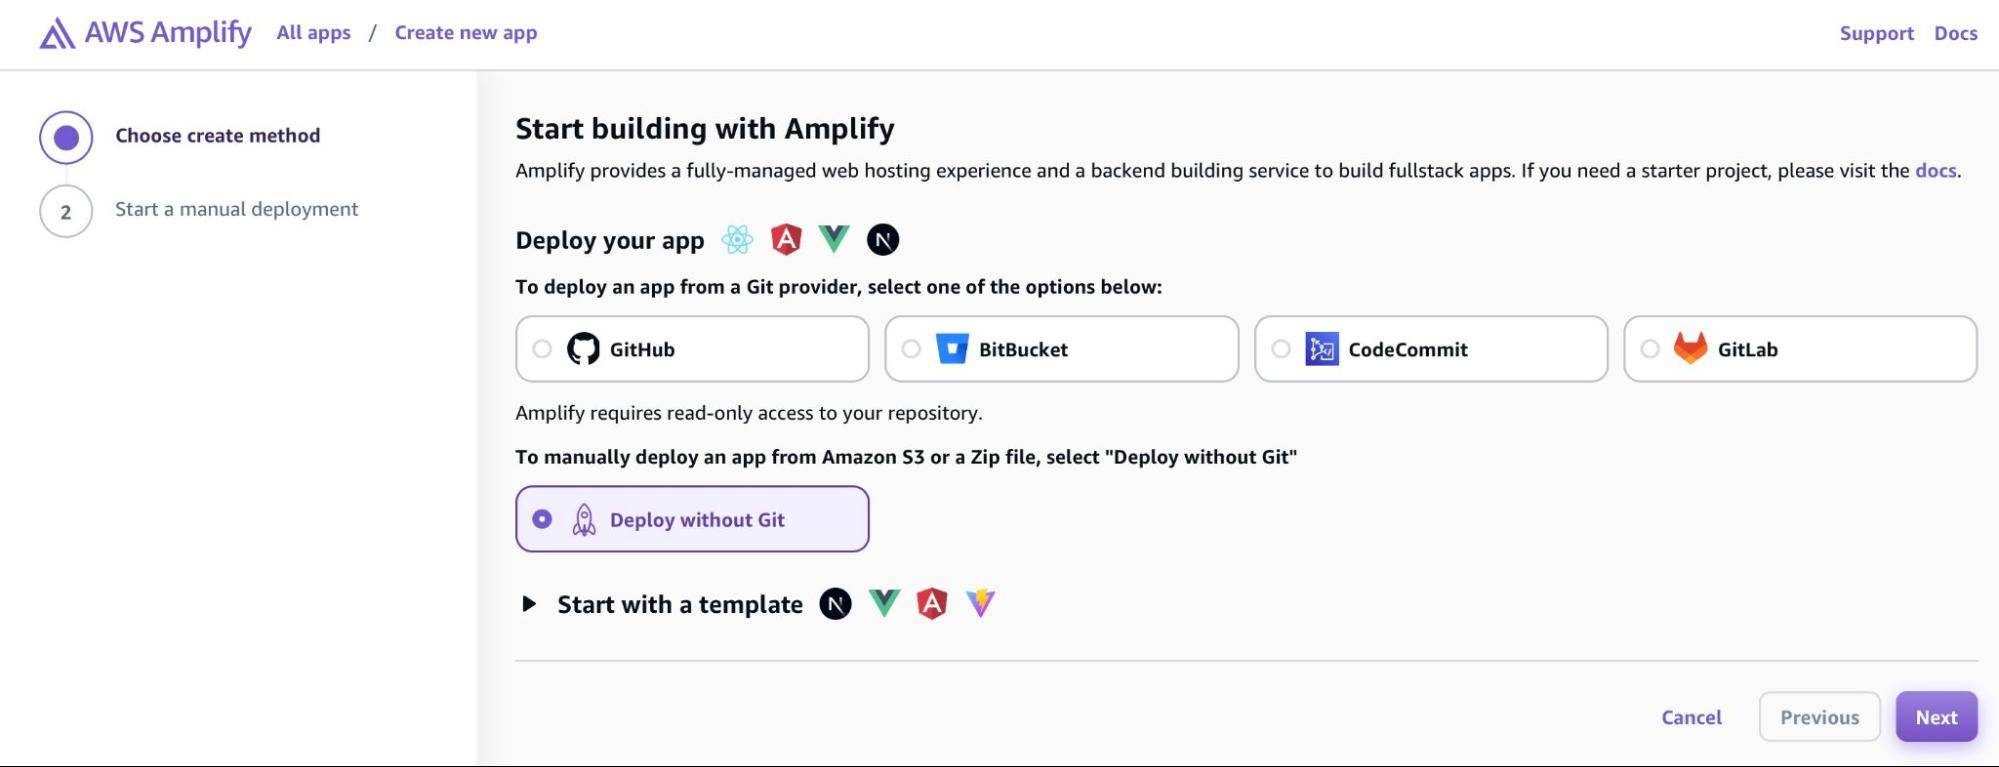
Select the option “Deploy without Git” and click the Next button.
Next, give your app a name and drag and drop the zipped index.html file.
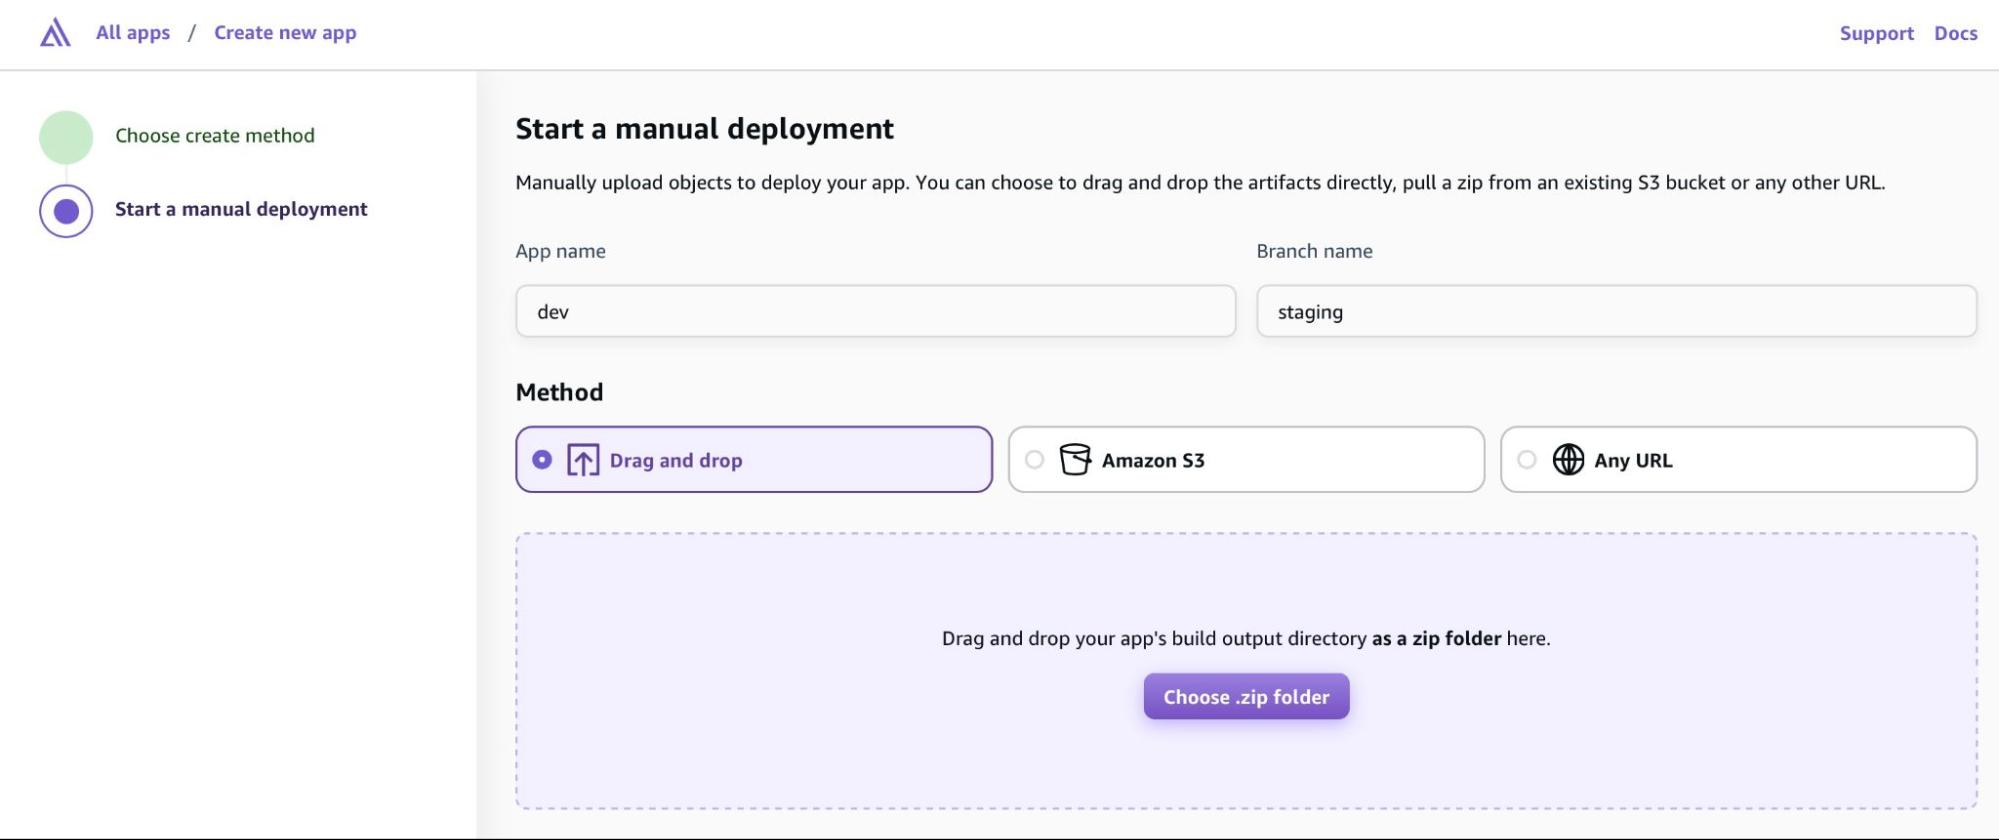
At the bottom of the page, click on the “Save and deploy” button to start the deployment process. After the process is complete, Amplify will generate a public URL.
What is AWS Lambda?
The Lambda function will handle the math calculation for the distance effortlessly.
AWS Lambda function is a bit of code that runs serverlessly in response to some trigger. For example, if you upload a picture to an S3 Bucket, it could trigger a Lambda function to process a thumbnail of that picture.
To put it in layman’s terms, AWS Lambda is code that runs when you need it, meaning you don’t have to set up servers to run the code, it just happens automatically behind the scenes.
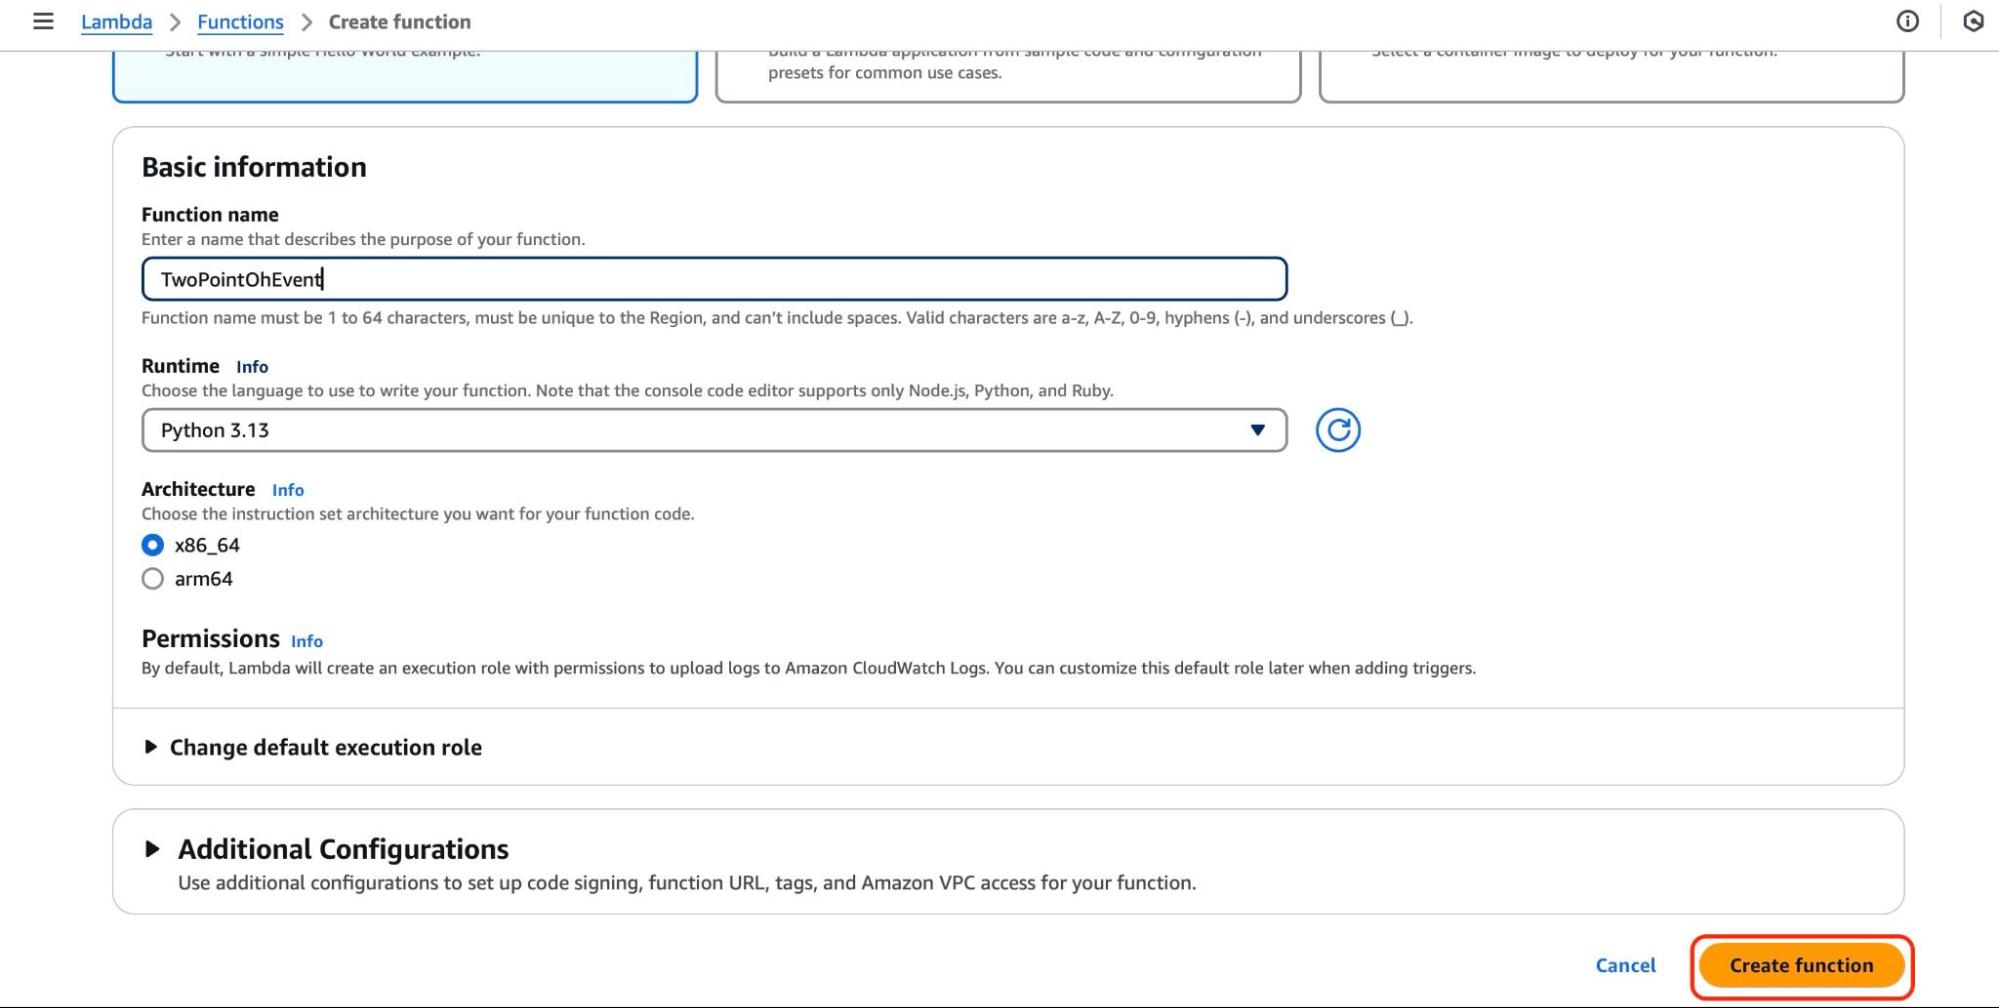
Let’s write the Python code that uses the math library to do the calculations we need between our two points. In your AWS console, select the Lambda service and create a function.

To create the function, we need to give it a name and select Python 3.13 for the runtime which is the language the function will be written. After that, make sure to click on the Create function button as you can leave the other default option.
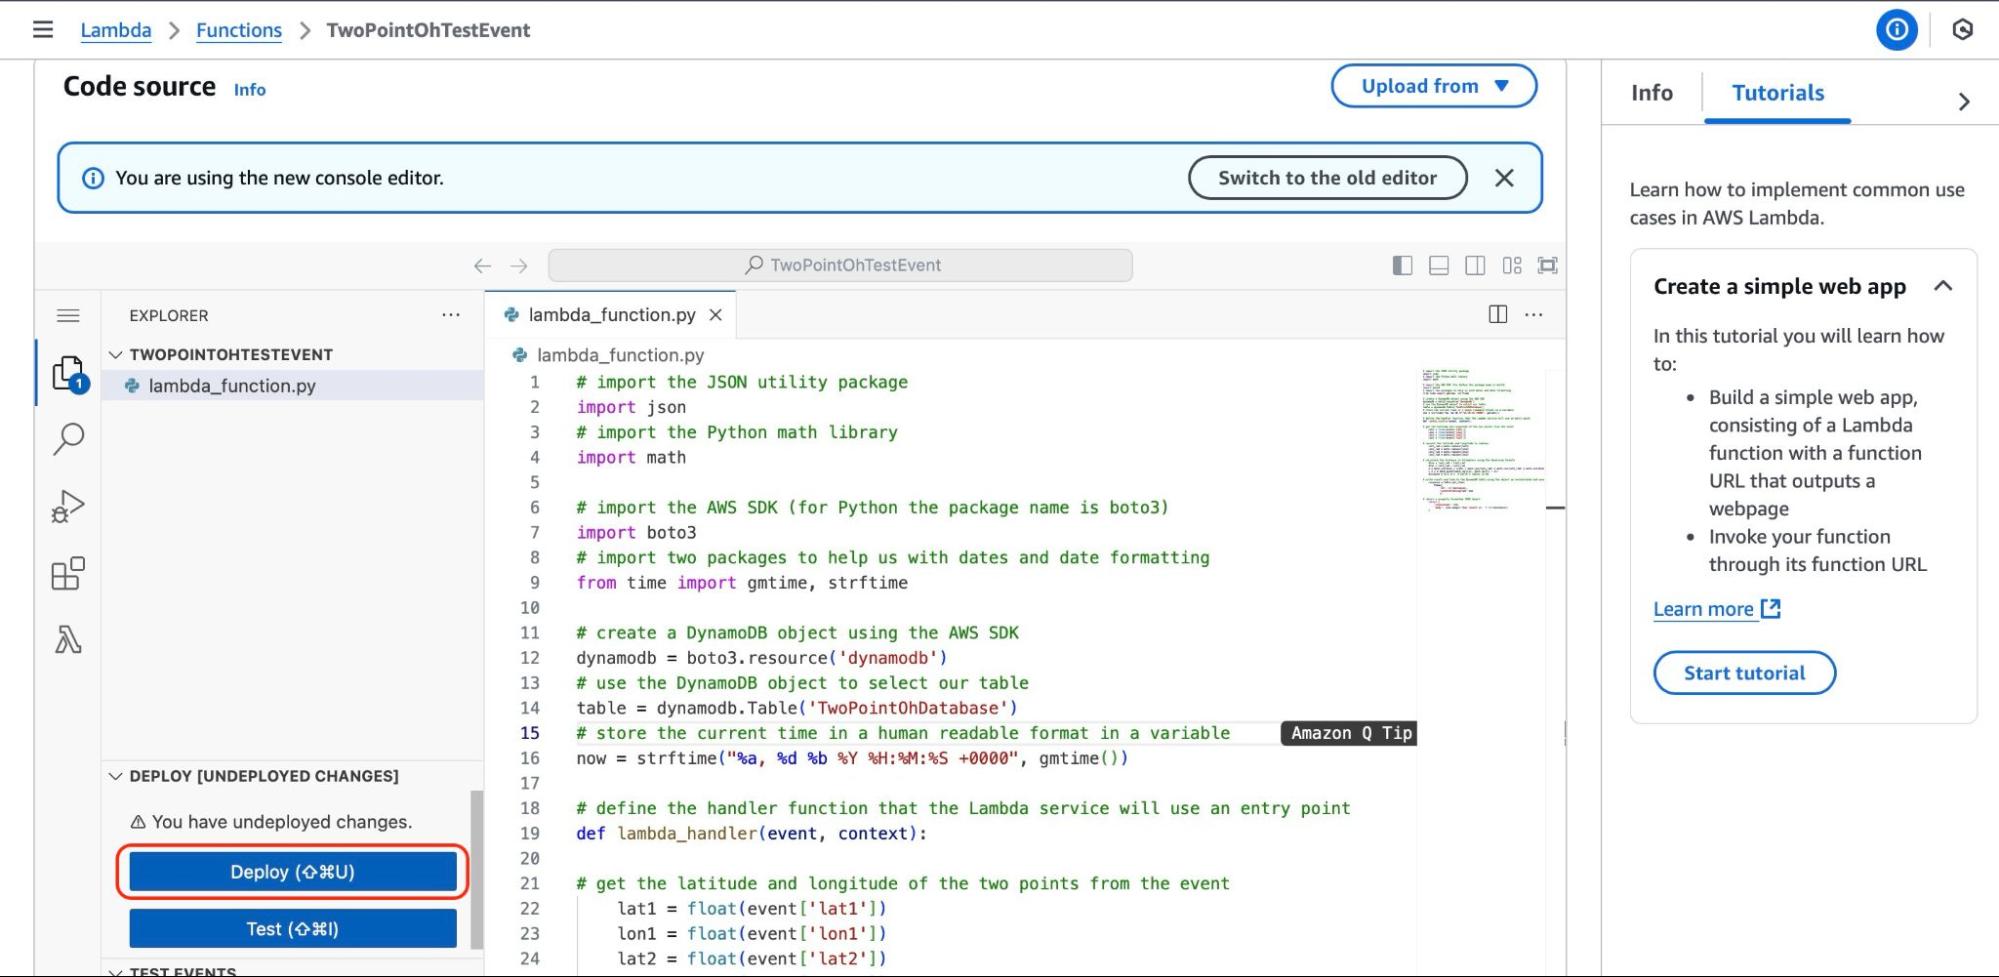
In the code tab, copy and paste this code into the text editor:
import json
import math

import boto3
from time import gmtime, strftime

# define the handler function that the Lambda service will use an entry point
def lambda_handler(event, context):

# get the latitude and longitude of the two points from the event
    lat1 = float(event['lat1'])
    lon1 = float(event['lon1'])
    lat2 = float(event['lat2'])
    lon2 = float(event['lon2'])

# convert the latitude and longitude to radians
    lat1_rad = math.radians(lat1)
    lon1_rad = math.radians(lon1)
    lat2_rad = math.radians(lat2)
    lon2_rad = math.radians(lon2)

# calculate the distance in kilometers using the Haversine formula
    dlon = lon2_rad - lon1_rad
    dlat = lat2_rad - lat1_rad
    a = math.sin(dlat / 2)**2 + math.cos(lat1_rad) * math.cos(lat2_rad) * math.sin(dlon / 2)**2
    c = 2 * math.atan2(math.sqrt(a), math.sqrt(1 - a))
    distance = 6371 * c  # Earth's radius in km

    return {
        'statusCode': 200,
        'body': json.dumps('Your result is ' + str(distance))
    }
The code snippet showcases a function called def lambda_handler(event, context) which the lambda service uses as an entry point to pull out the different parameters that get sent to the function when it is invoked.
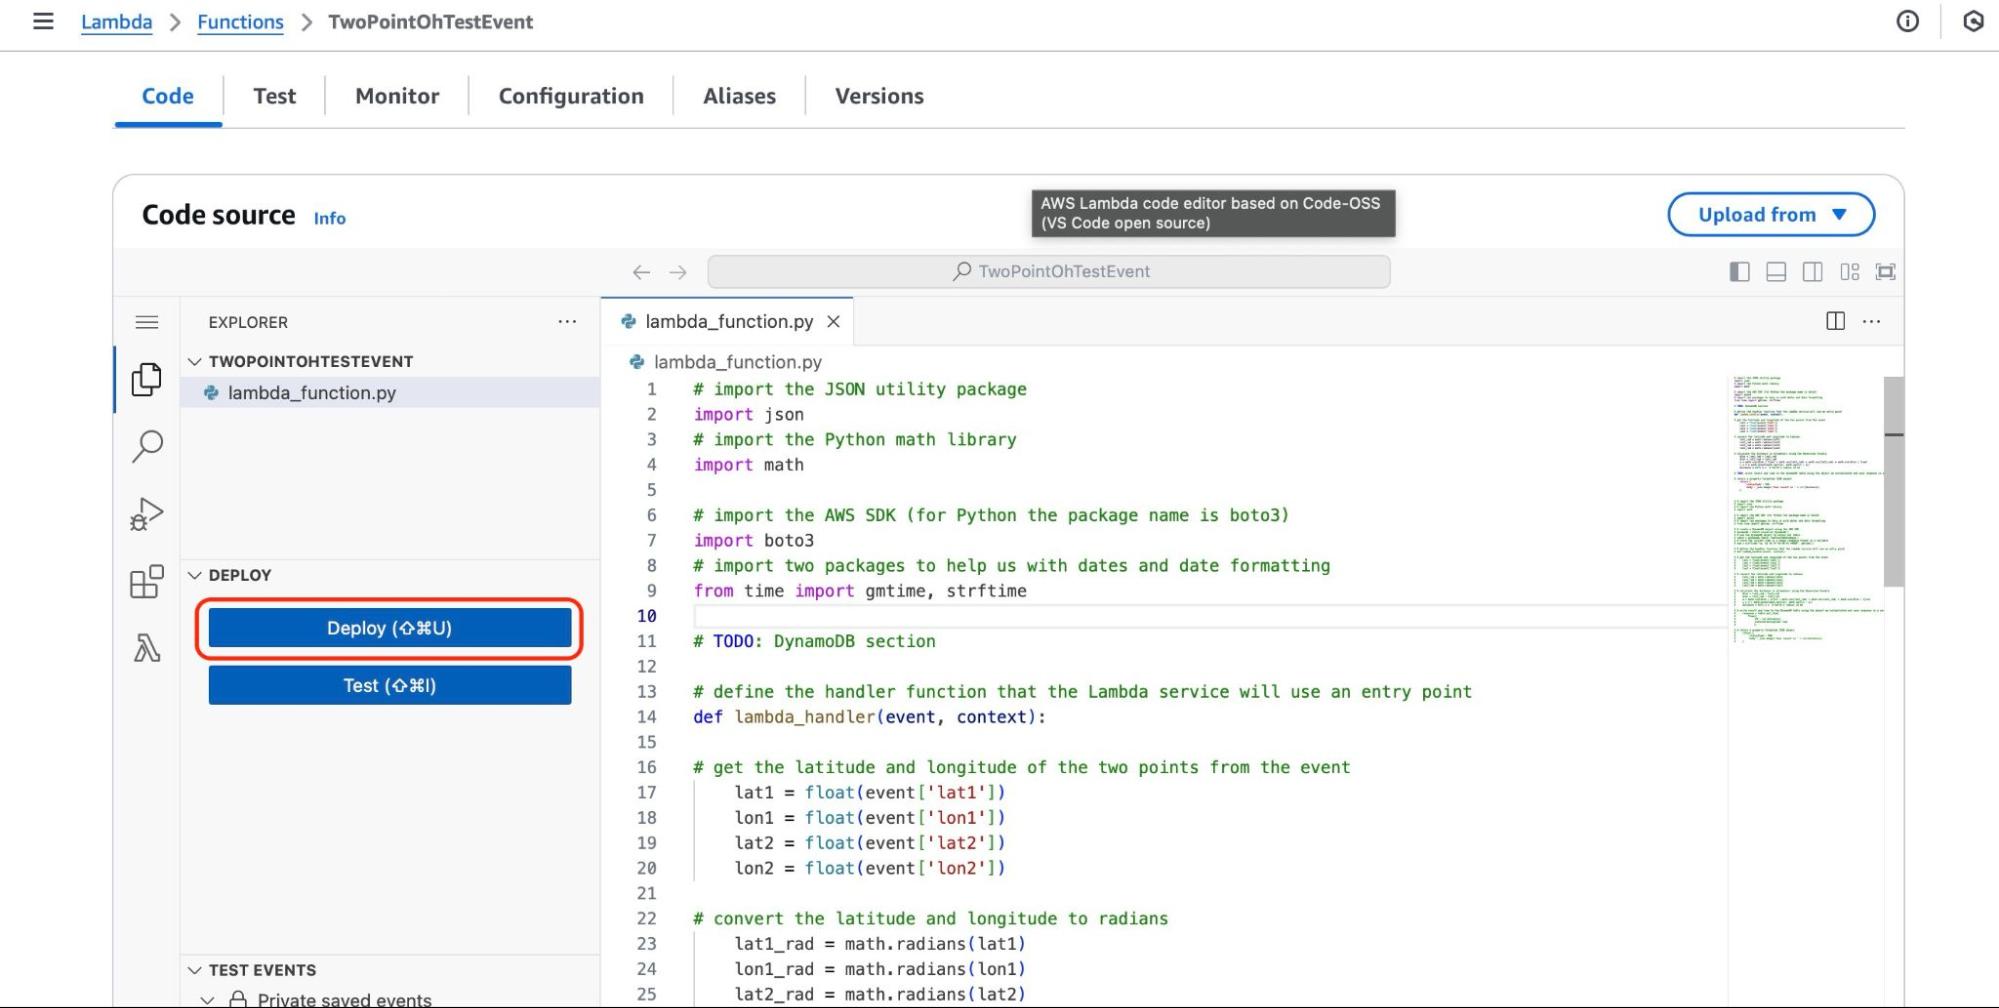
With the code in place, deploy the code by clicking the Deploy button. After this is complete, switch to the Test tab where the user will pass in four numbers of the location both their latitude and longitude values.
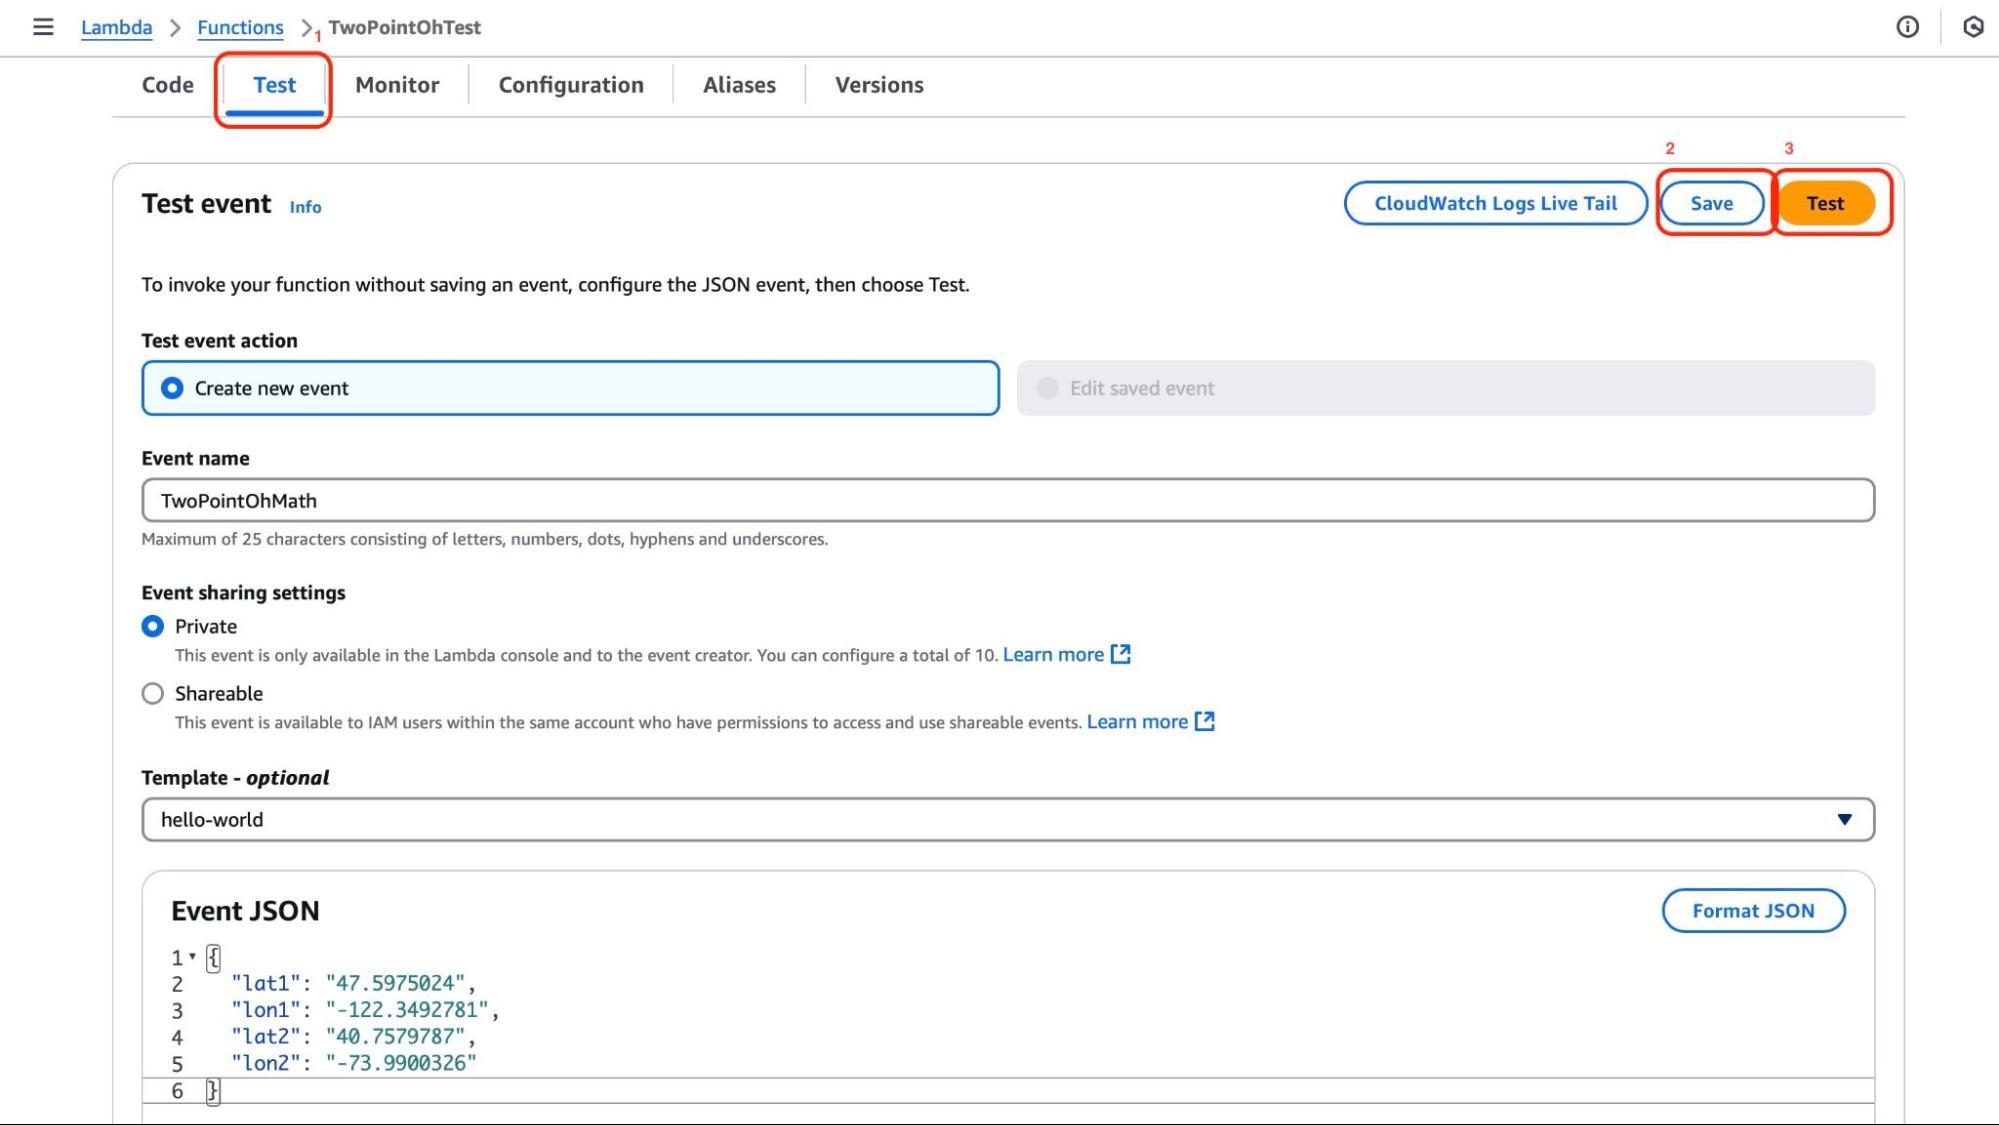
Paste this JSON code below in the Event JSON section to represent the four different values that normally will come in from the user interface. Or better still use your values.
{
  "lat1": "47.5975024",
  "lon1": "-122.3492781",
  "lat2": "40.7579787",
  "lon2": "-73.9900326"
}
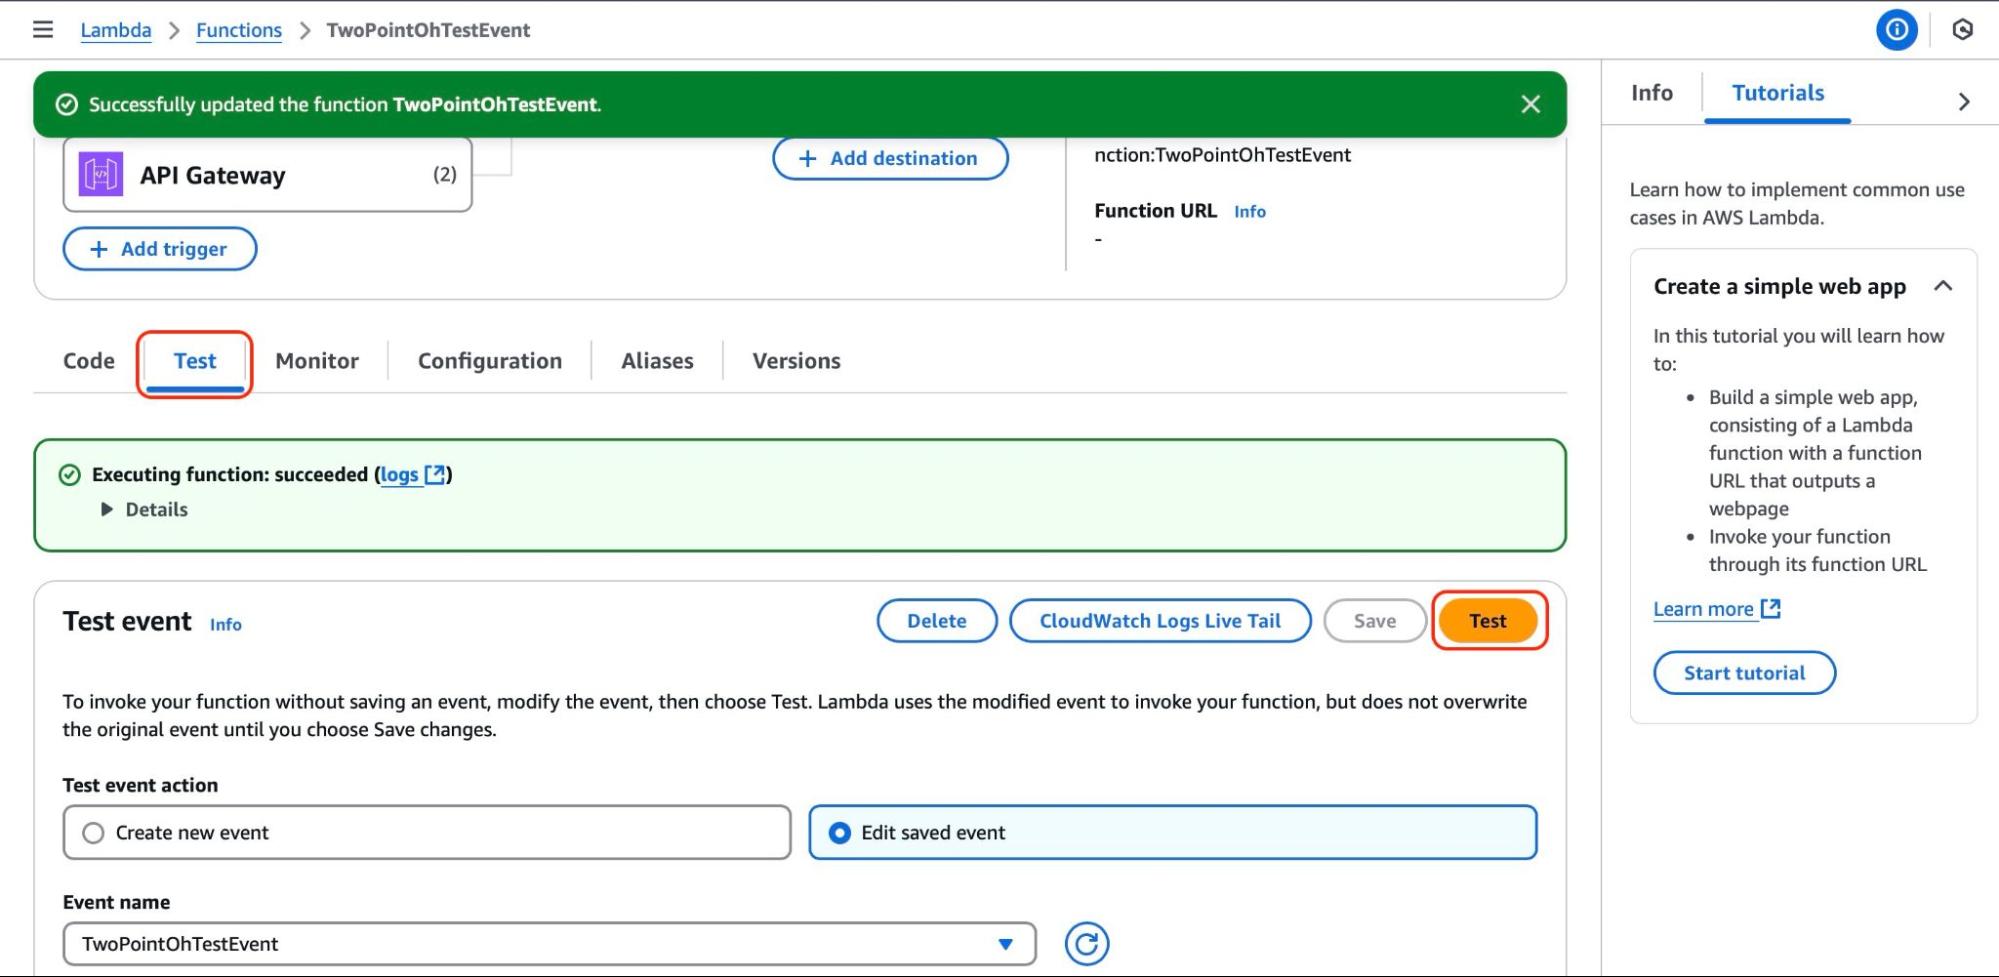
Now click on the Save button and after that the Test button to configure a test. Run this test to ensure things are calculated properly.
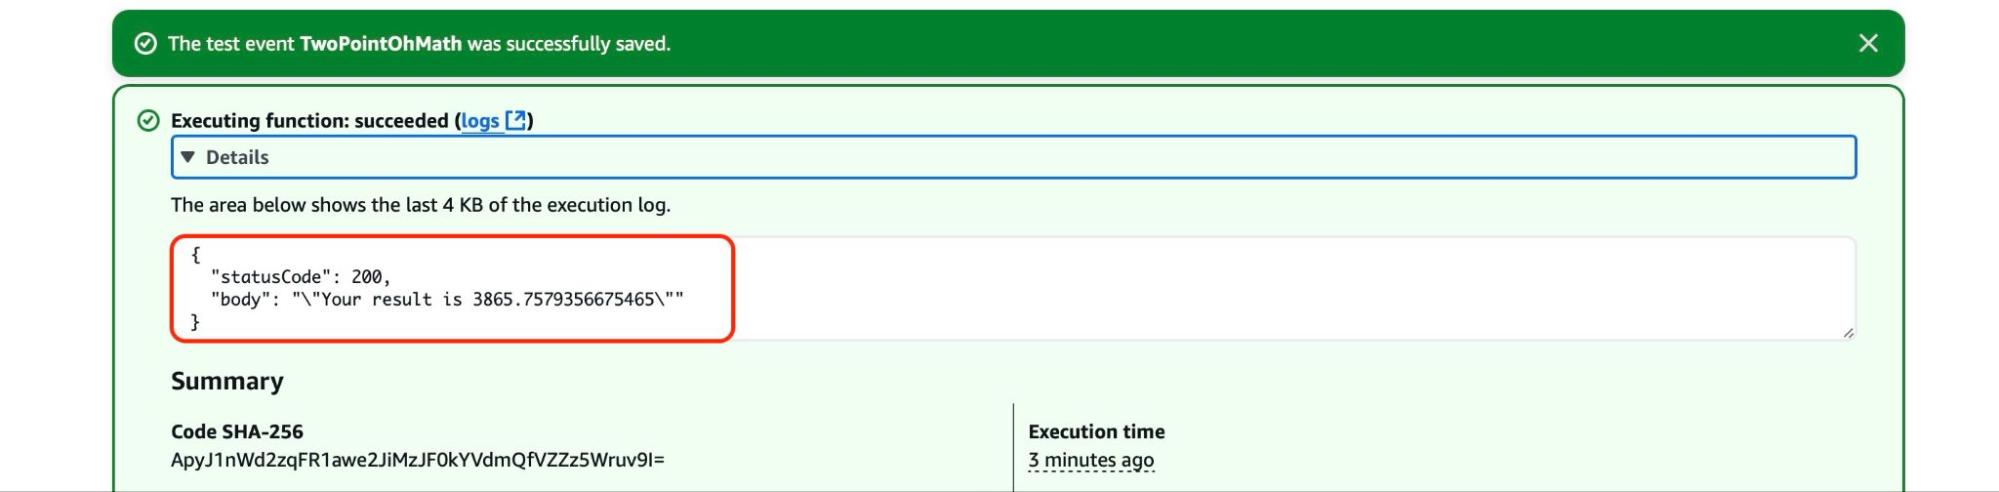
The executed code should look like this with the response of the status code and the body, the result of the distance.
To invoke the math functionality, we need a public endpoint or URL that can be called to trigger that function to run which will make use of API Gateway. The core service in AWS that you can use to build, deploy, and manage APIs.
API Gateway
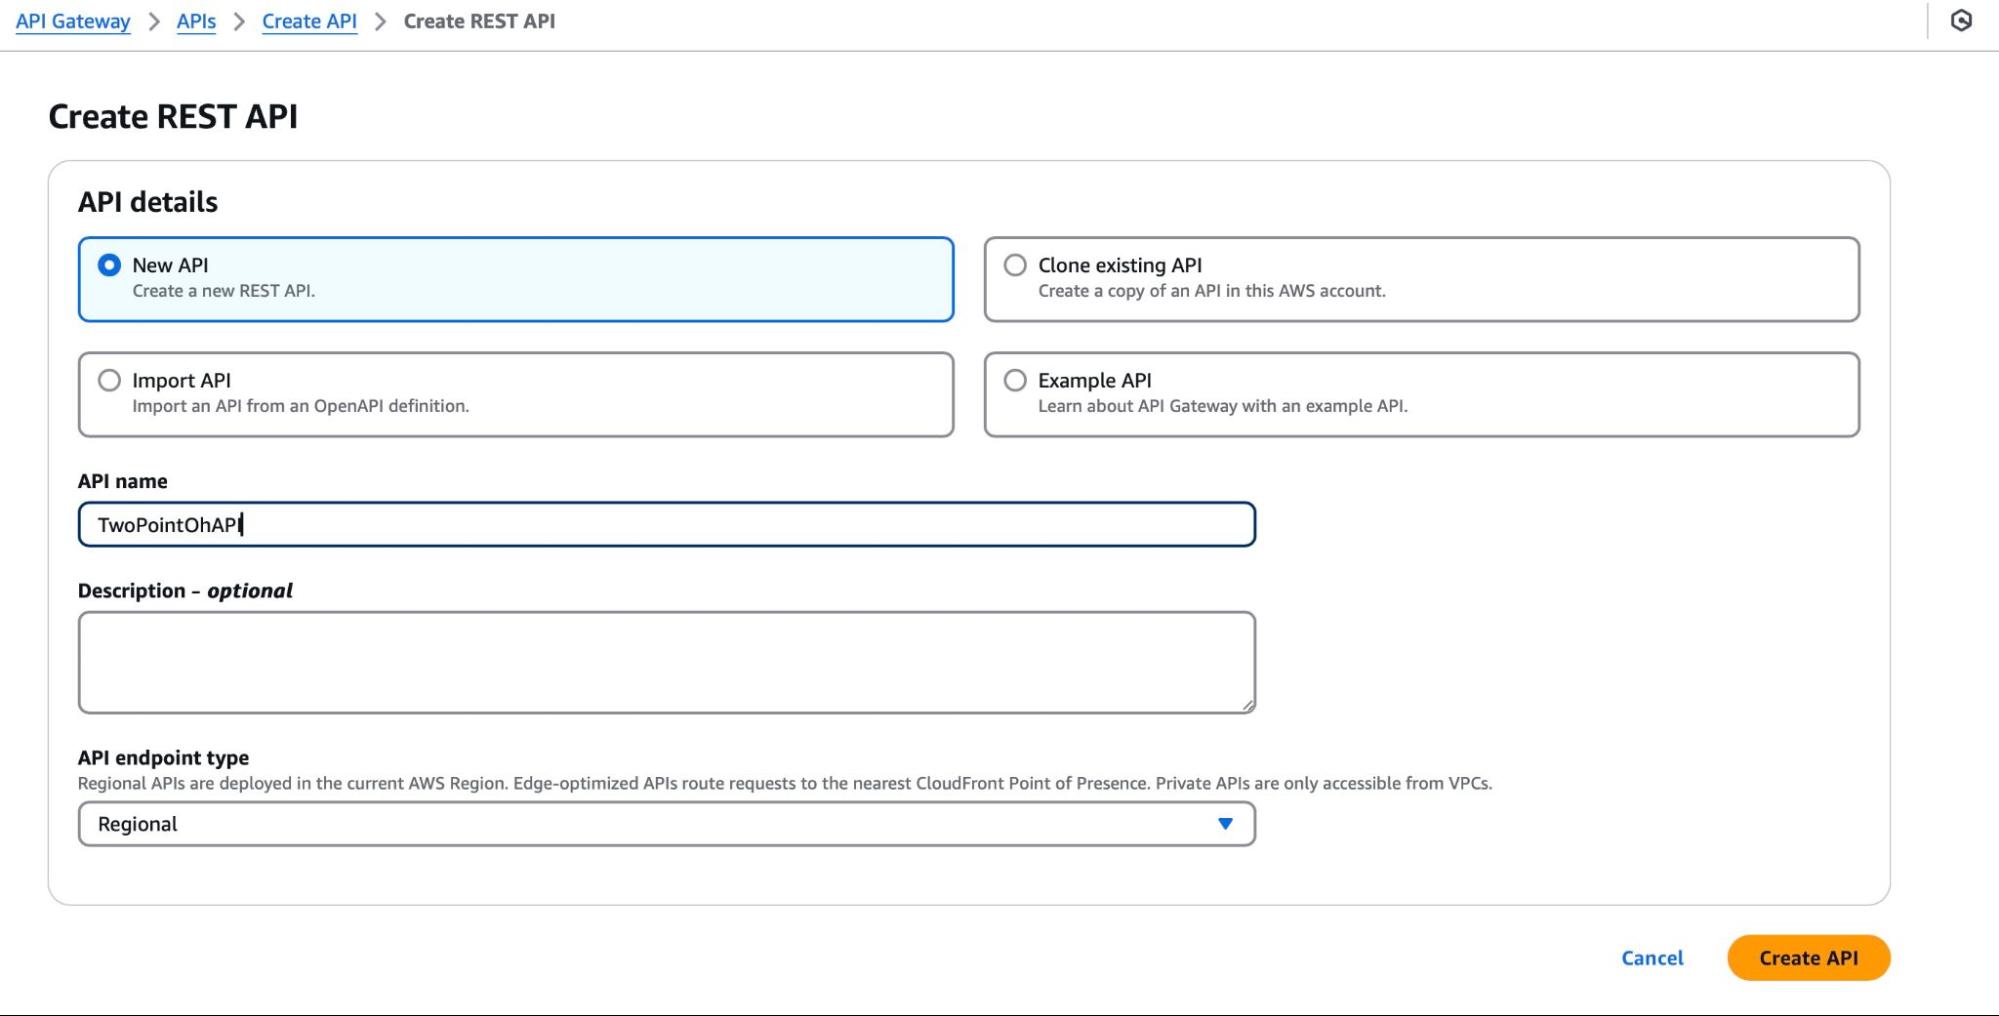
On your API Gateway console, create a new API and select the REST API option. Click on Build.
Next, create a method.
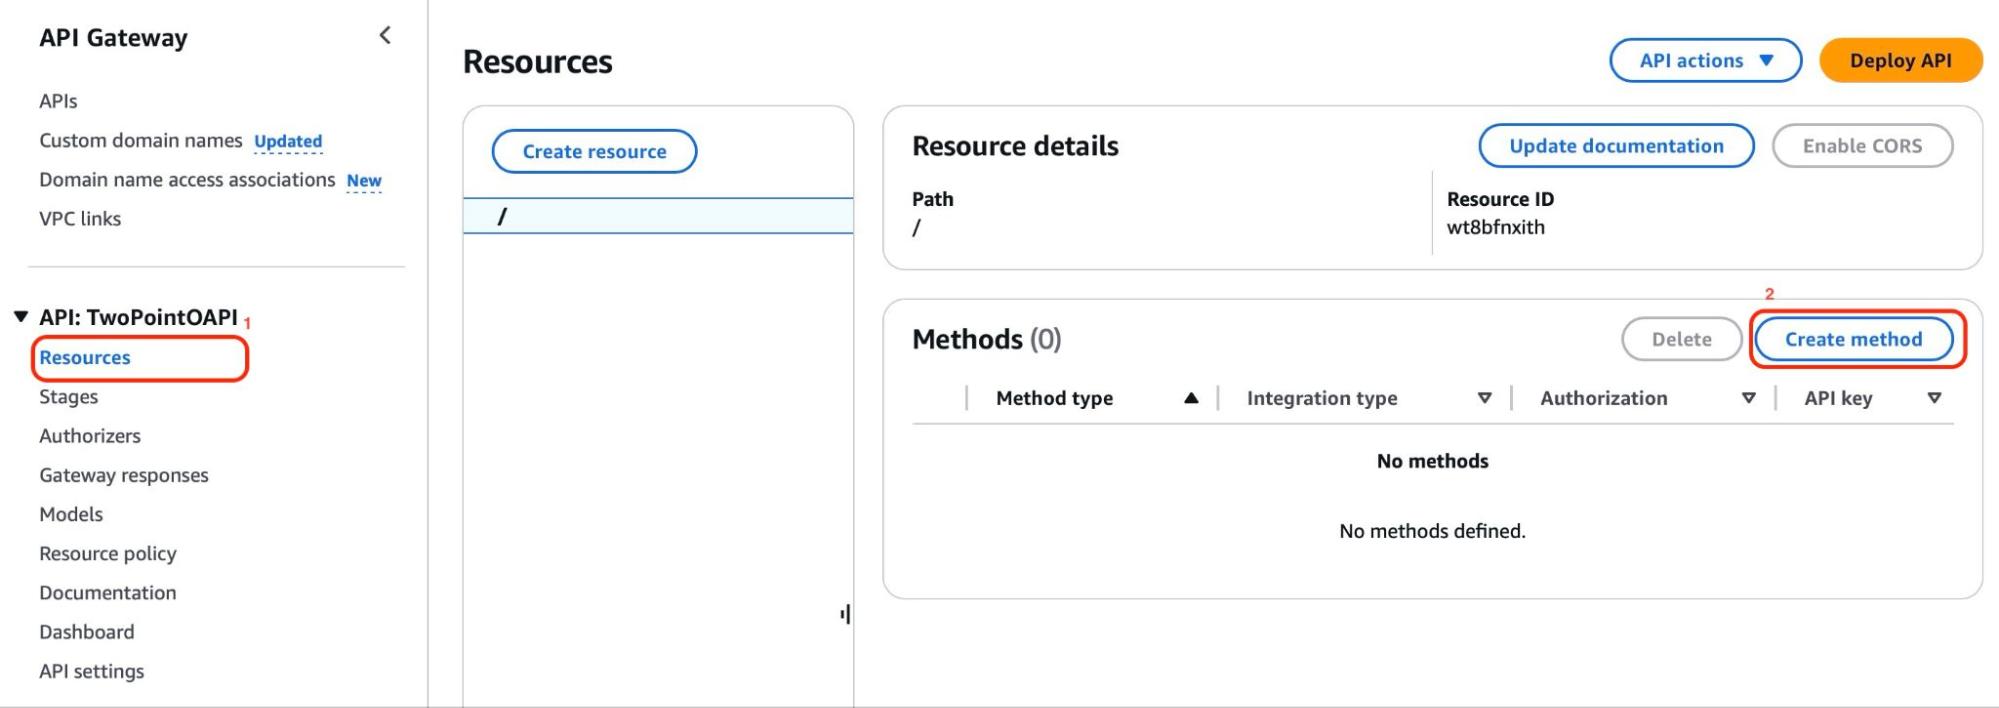
With the new page opened after clicking the Create method, select the method type from the dropdown and choose POST (as we will be passing data from the user). The integration type should be Lambda function and beside your region, type in the name or alias of the lambda function you created earlier as shown:
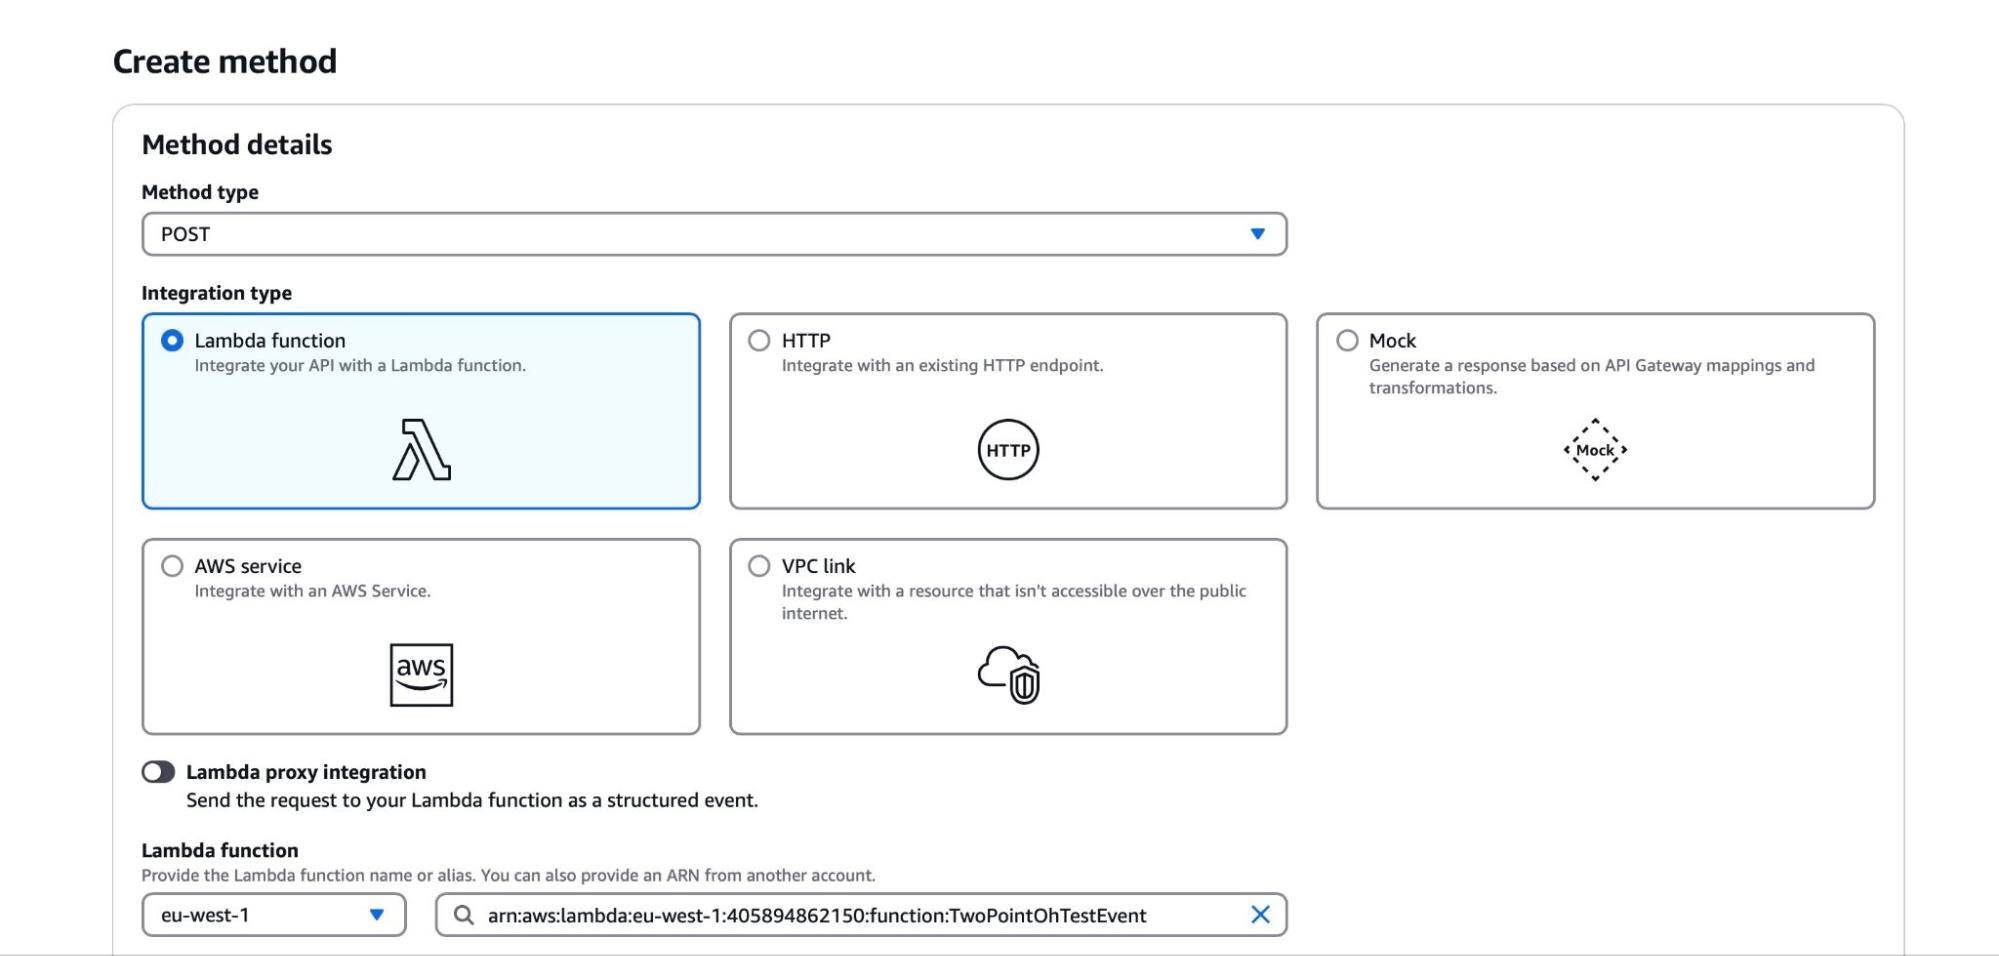
Scroll and click the Create method button.
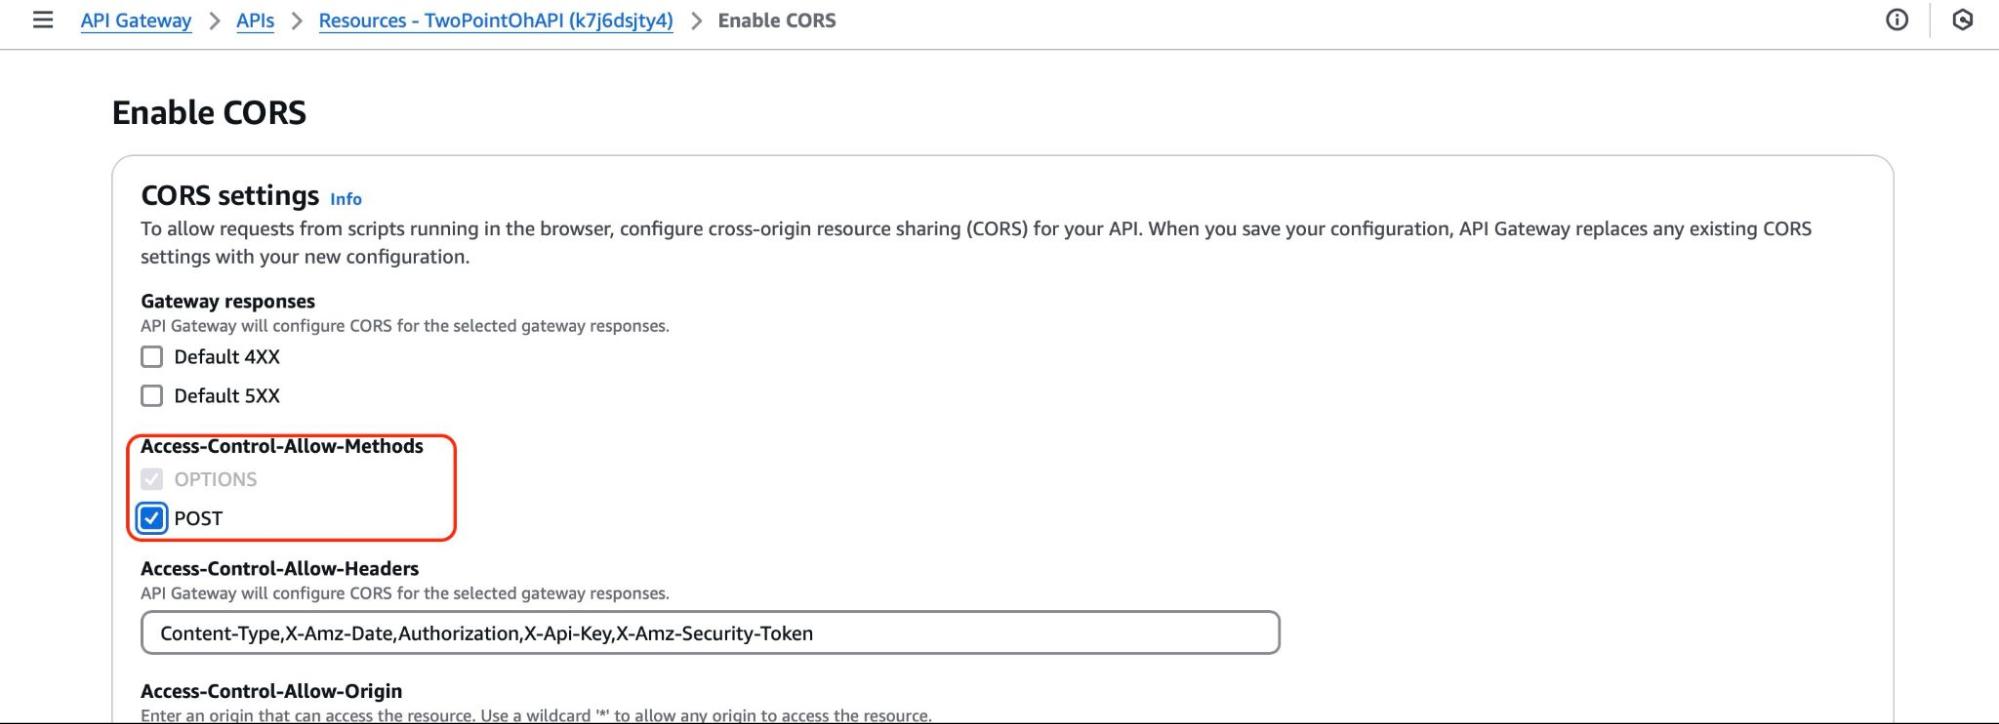
Before deploying the API, we need to enable CORS. Click on the / path and the Enable CORS button.

The function of enabling CORS (cross-origin resource sharing) is to give the web application on one origin or domain the right to access resources on another origin or domain. Since Amplify will be running on one domain and our Lambda function on another to access the API Gateway, the resource is required for this step. So in essence, we need to work across those domains or origins.
Under the Access-Control-Allow-Methods section, select the POST method and save it.
Let’s deploy the API. When you click on the Deploy API button, a pop-up appears, and on the Stage option dropdown, select New Stage and give it a Stage name. Make sure to click on Deploy so it generates the invoke URL.
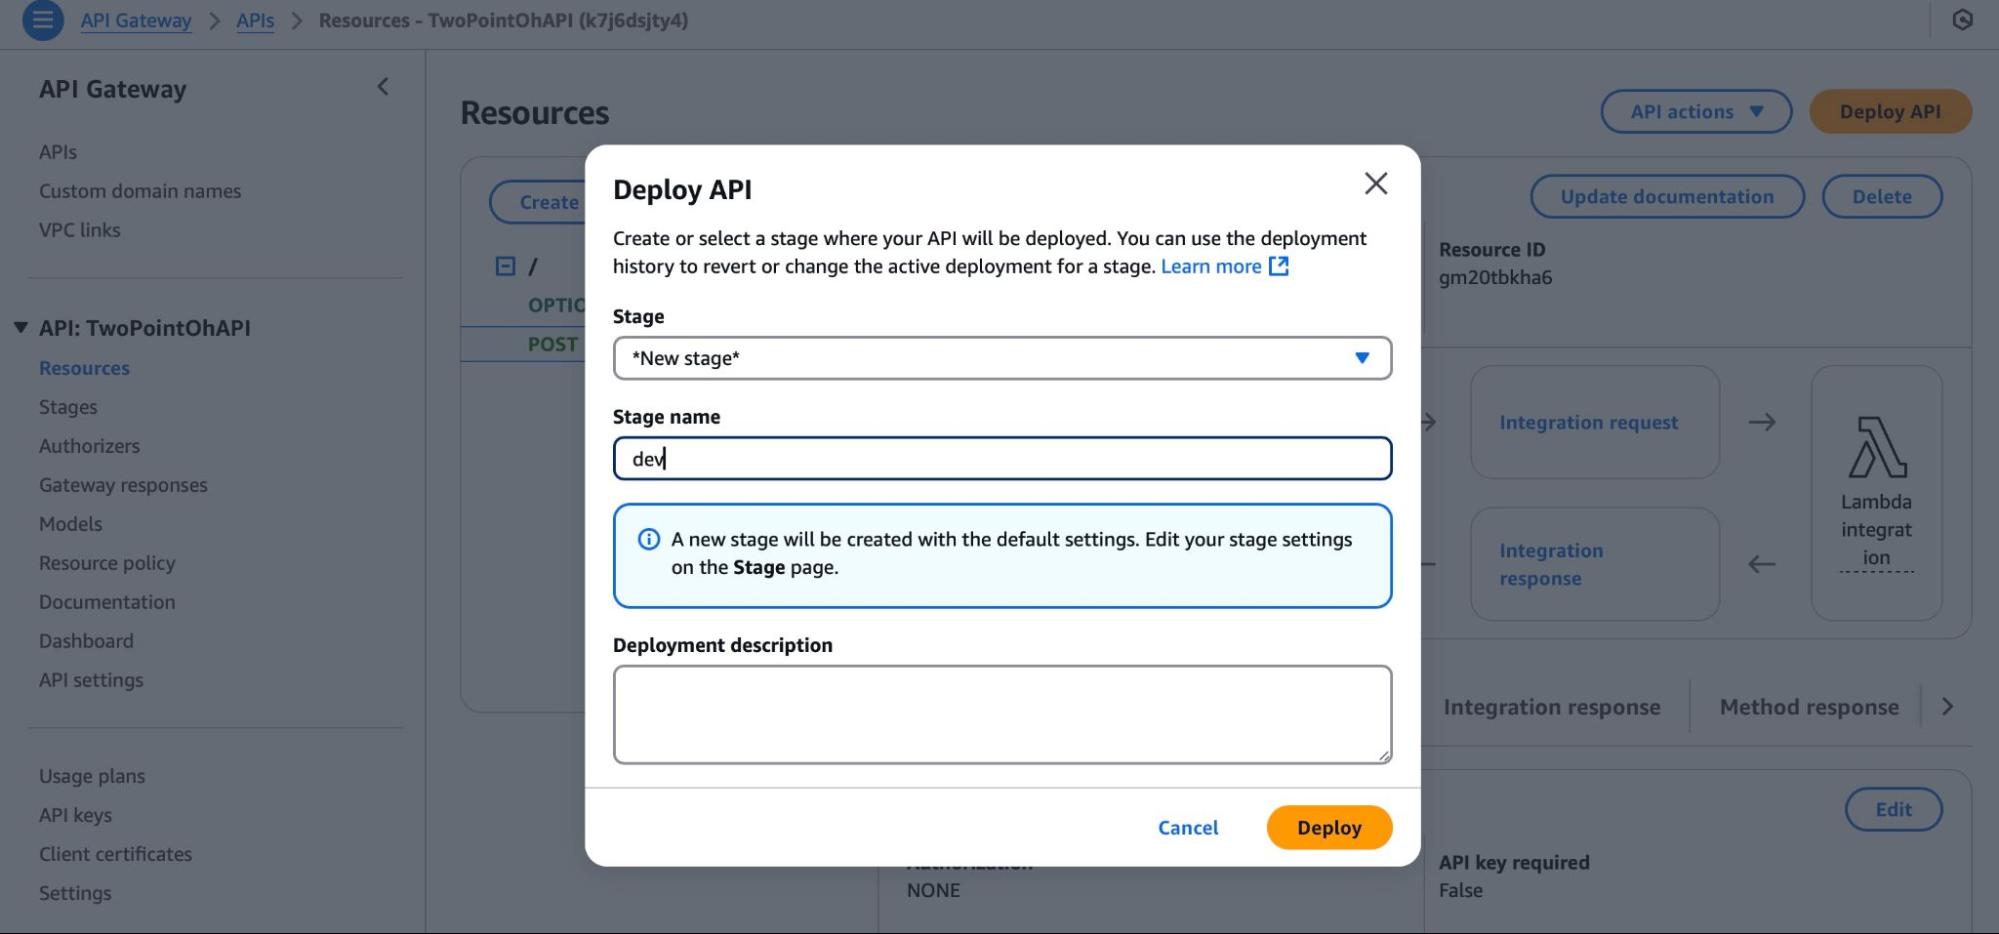
Copy the URL as we will be needing it later in our HTML page. The invoke URL should look something like this:
https://410ddoituf.execute-api.eu-west-1.amazonaws.com/dev
The last step of this setup is to validate the API by testing it. On the resources tab, select the POST method and Test tab while entering your four values of the latitude and longitude.
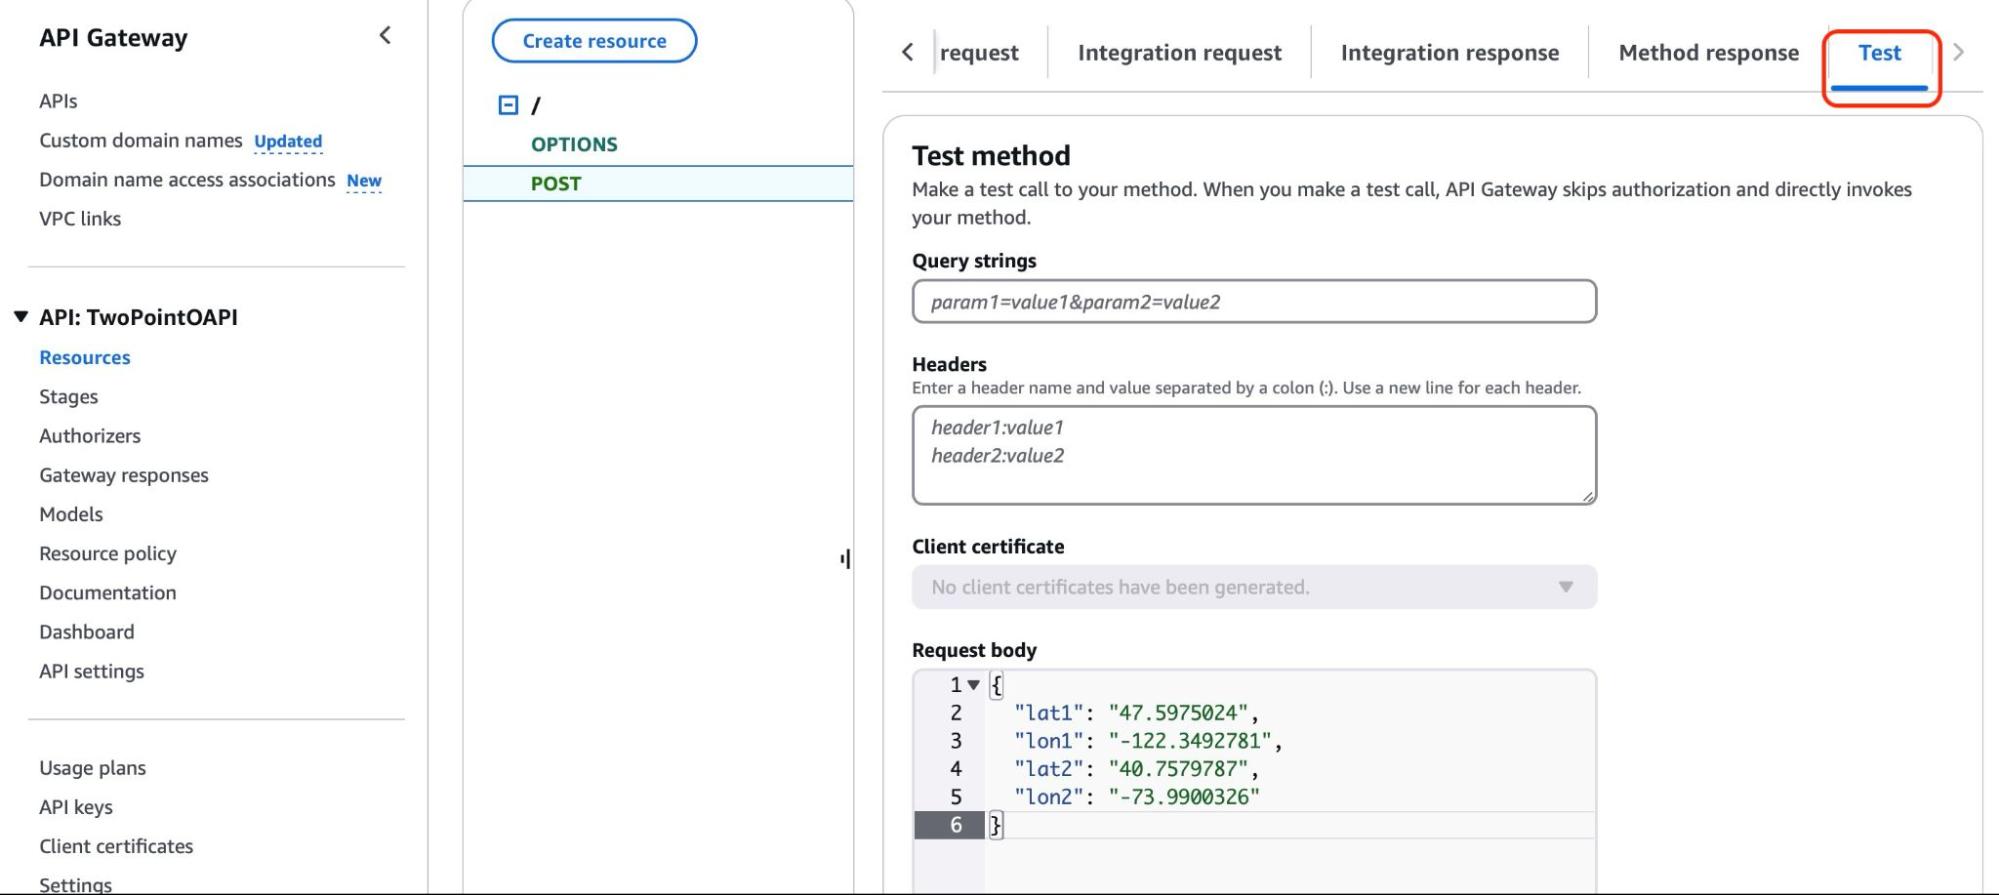
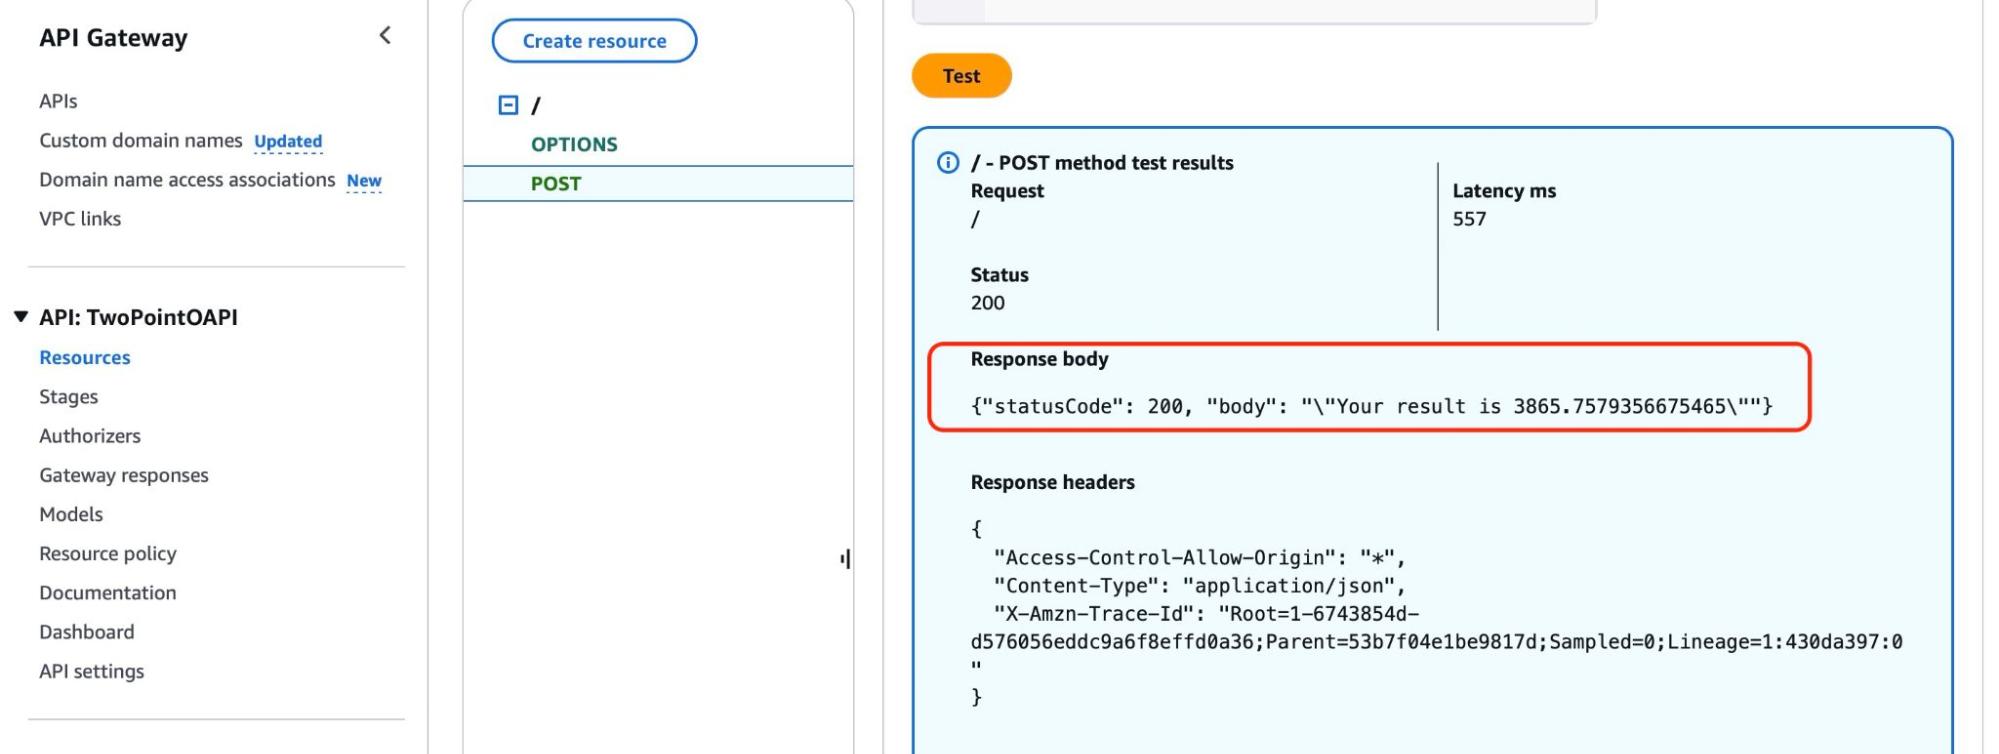
Scroll the page to click on the Test button and you will see the result of your response.
AWS DynamoDB, its Identity and Access Management (IAM)
Most real-world applications these days have databases and incorporating a database to persist and store the math result and return it to the user is crucial for dynamic apps. Also, we will learn how to permit Lambda to write to the database.
DynamoDB is a key-value NoSQL database that is generally light-weight than relational databases where you have to set up the schema ahead of time and the relationships.
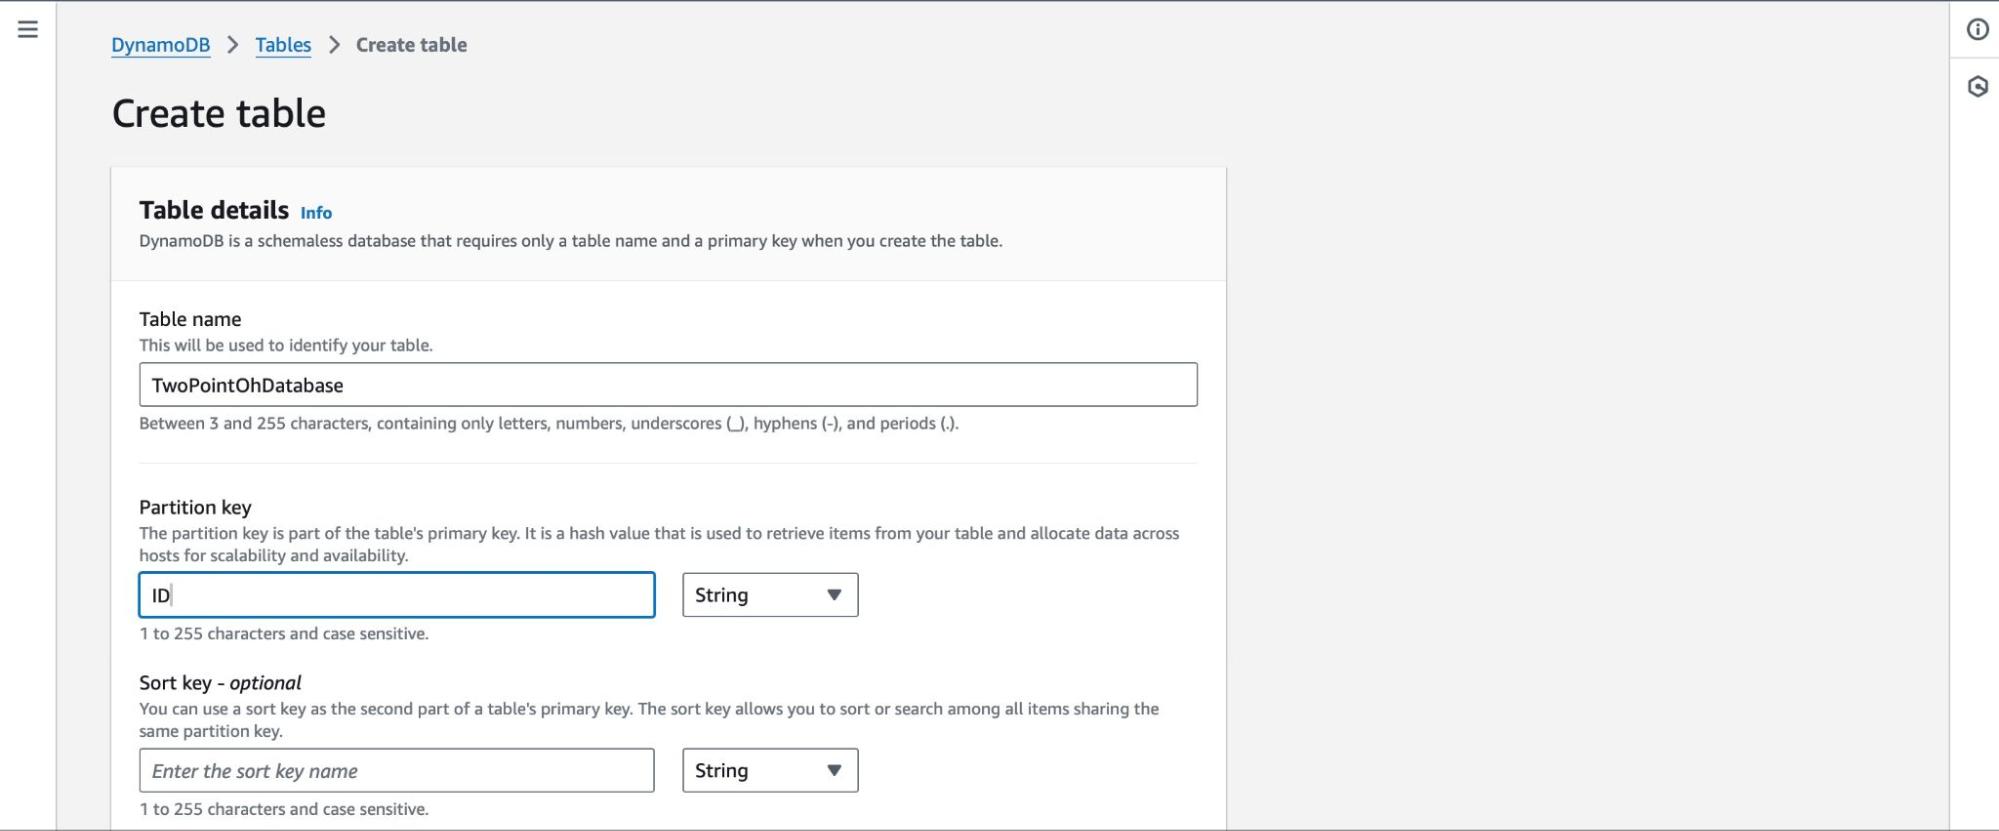
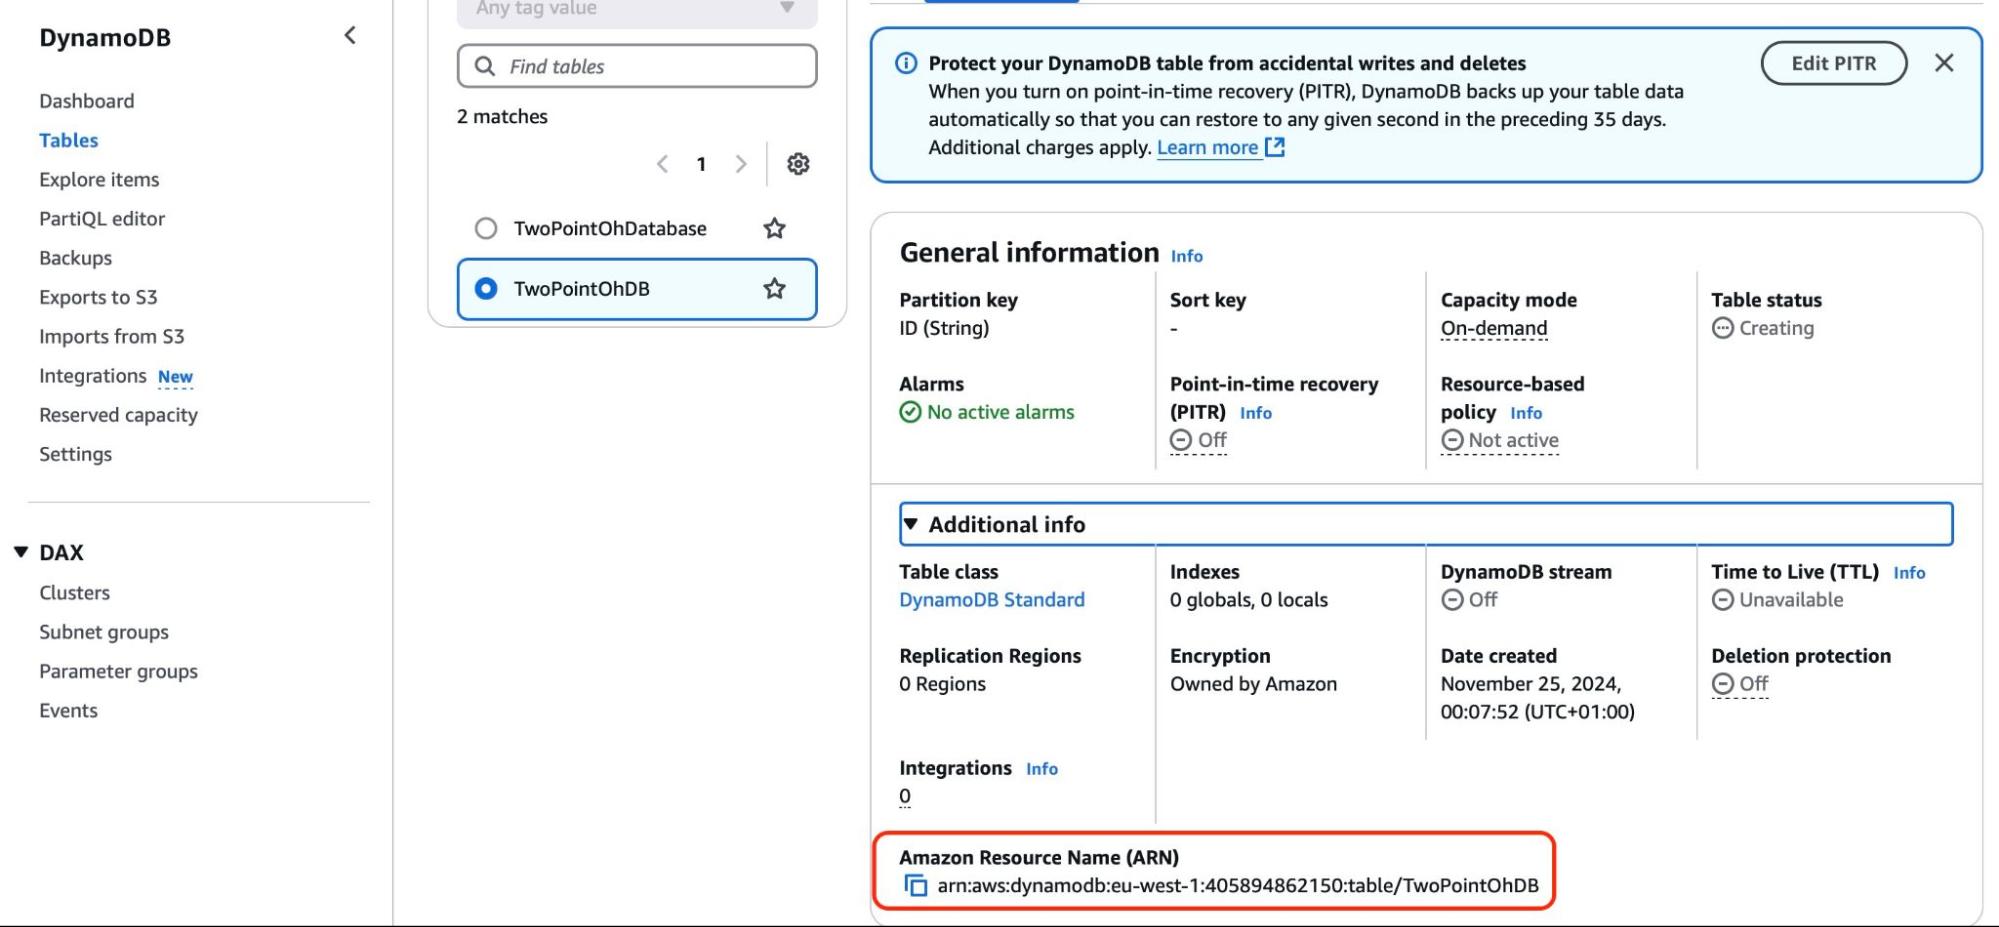
Back in your console, navigate to DynamoDB and create a new table as shown with the table name and the partition key, as ID by selecting the Tables tab or clicking the Create table button.
Within the Additional Info section copy the ARN (amazon resource name) which identifies the table within AWS.
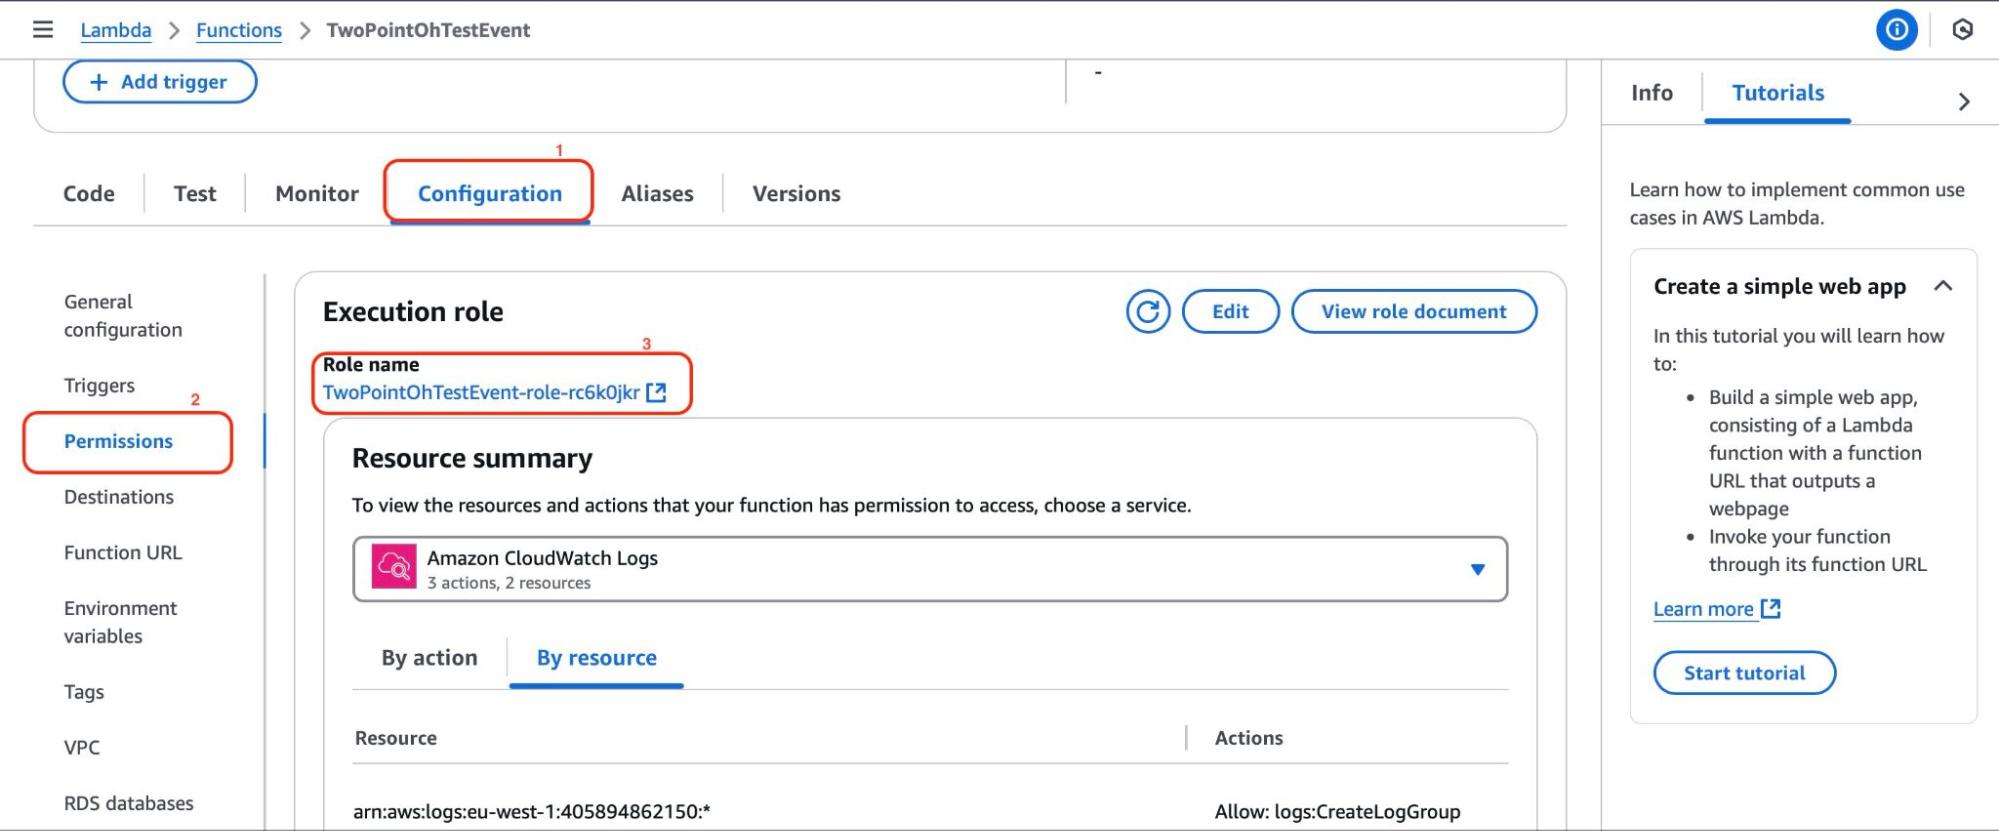
Next, navigate back to the Lambda function to update the code to be able to save values into DynamoDB. Before doing that, let’s configure the permission by clicking on the Role name.
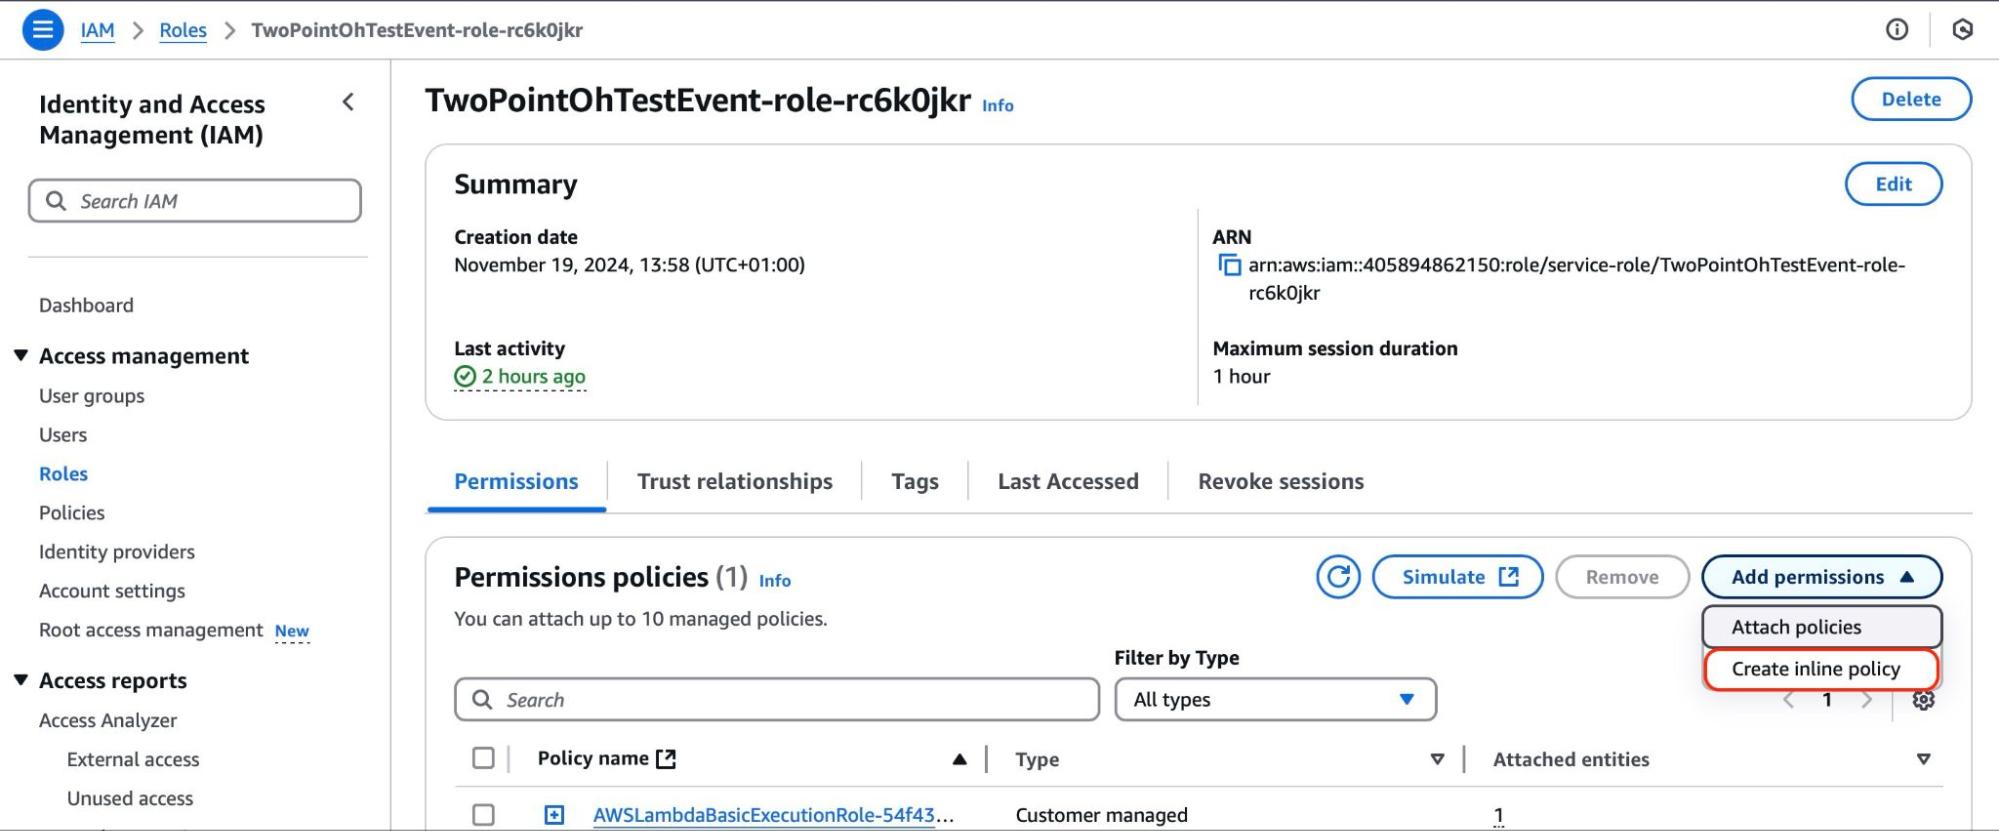
It opens in a new tab. Click Add permissions and from the dropdown select Create inline policy.
Copy and paste this permission statements code in the JSON editor:
{
"Version": "2012-10-17",
"Statement": [
    {
        "Sid": "VisualEditor0",
        "Effect": "Allow",
        "Action": [
            "dynamodb:PutItem",
            "dynamodb:DeleteItem",
            "dynamodb:GetItem",
            "dynamodb:Scan",
            "dynamodb:Query",
            "dynamodb:UpdateItem"
        ],
        "Resource": "YOUR-TABLE-ARN" # replace with the ARN of the table you created earlier
    }
    ]
}
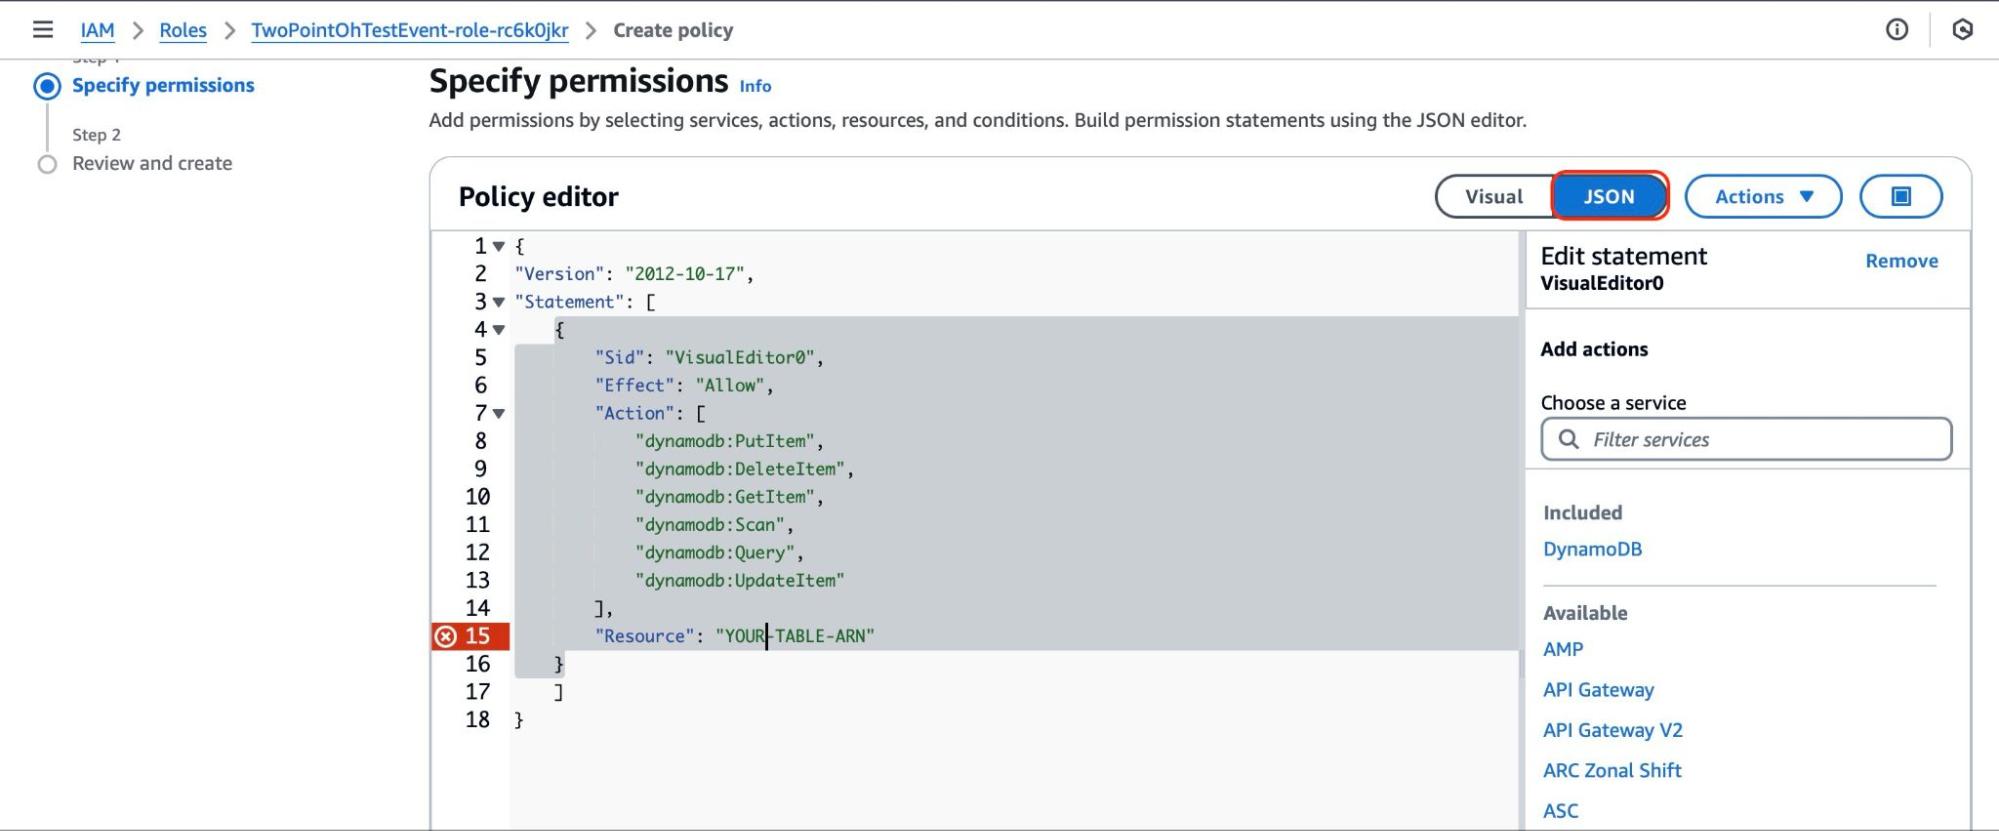
Now, paste your copied ARN you copied previously. Click on Next to give it a policy name and create the policy.

To check the data is saved to DynamoDB, under the code tab of the Lambda function, paste this updated code:
import json
import math

import boto3
from time import gmtime, strftime

dynamodb = boto3.resource('dynamodb')
table = dynamodb.Table(‘YOUR DYNAMODB DATABASE NAME’)
now = strftime("%a, %d %b %Y %H:%M:%S +0000", gmtime())

def lambda_handler(event, context):

    lat1 = float(event['lat1'])
    lon1 = float(event['lon1'])
    lat2 = float(event['lat2'])
    lon2 = float(event['lon2'])

    lat1_rad = math.radians(lat1)
    lon1_rad = math.radians(lon1)
    lat2_rad = math.radians(lat2)
    lon2_rad = math.radians(lon2)

    dlon = lon2_rad - lon1_rad
    dlat = lat2_rad - lat1_rad
    a = math.sin(dlat / 2)**2 + math.cos(lat1_rad) * math.cos(lat2_rad) * math.sin(dlon / 2)**2
    c = 2 * math.atan2(math.sqrt(a), math.sqrt(1 - a))
    distance = 6371 * c  # Earth's radius in km

    response = table.put_item(
        Item={
            'ID': str(distance),
            'LatestGreetingTime':now
            })

    return {
        'statusCode': 200,
        'body': json.dumps('Your result is ' + str(distance))
    }
This code block will write the distance and the time of the calculation in DynamoDB. Replace the value of the name of your database within the parenthesis:
table = dynamodb.Table(‘TwoPointOhDB’)
The same process of deploying and testing is necessary to ensure it sends the correct data to DynamoDB.
In your console, go back to DynamoDB to check if the distance and time were saved in the database by clicking on the Explore table items.
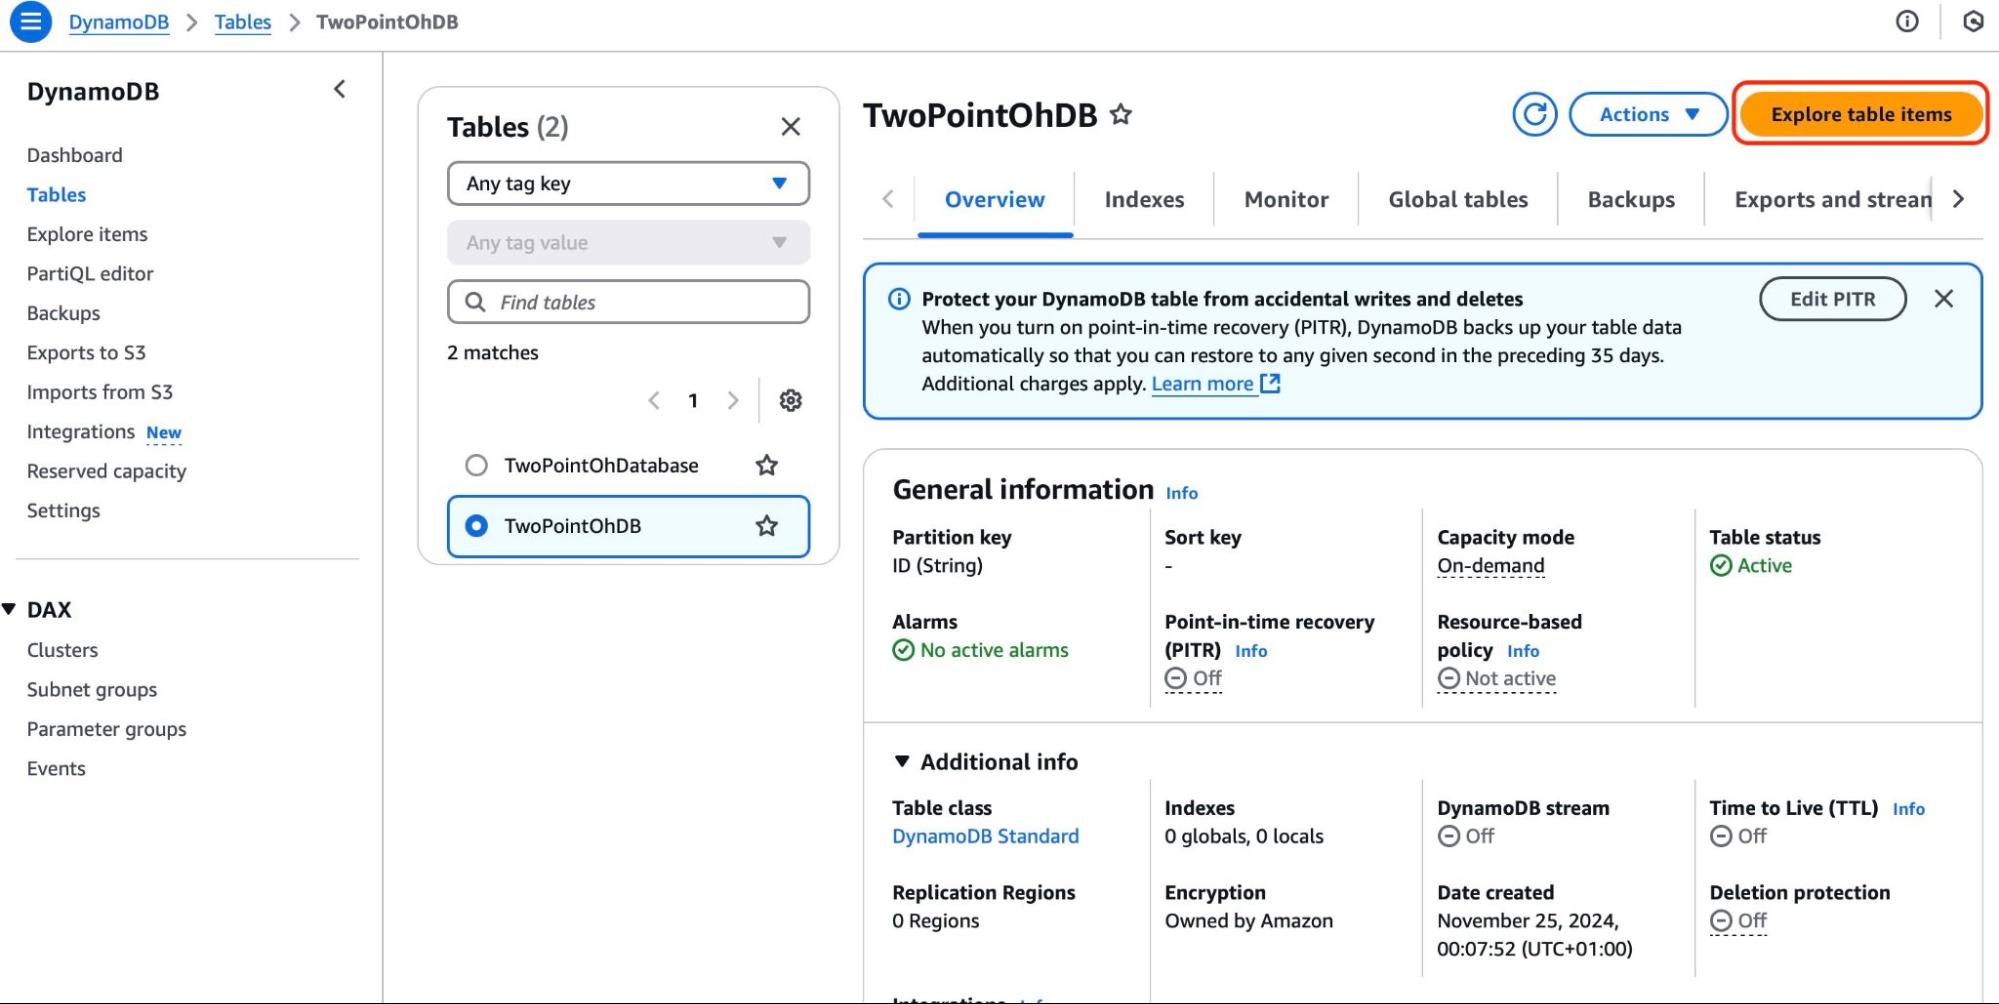
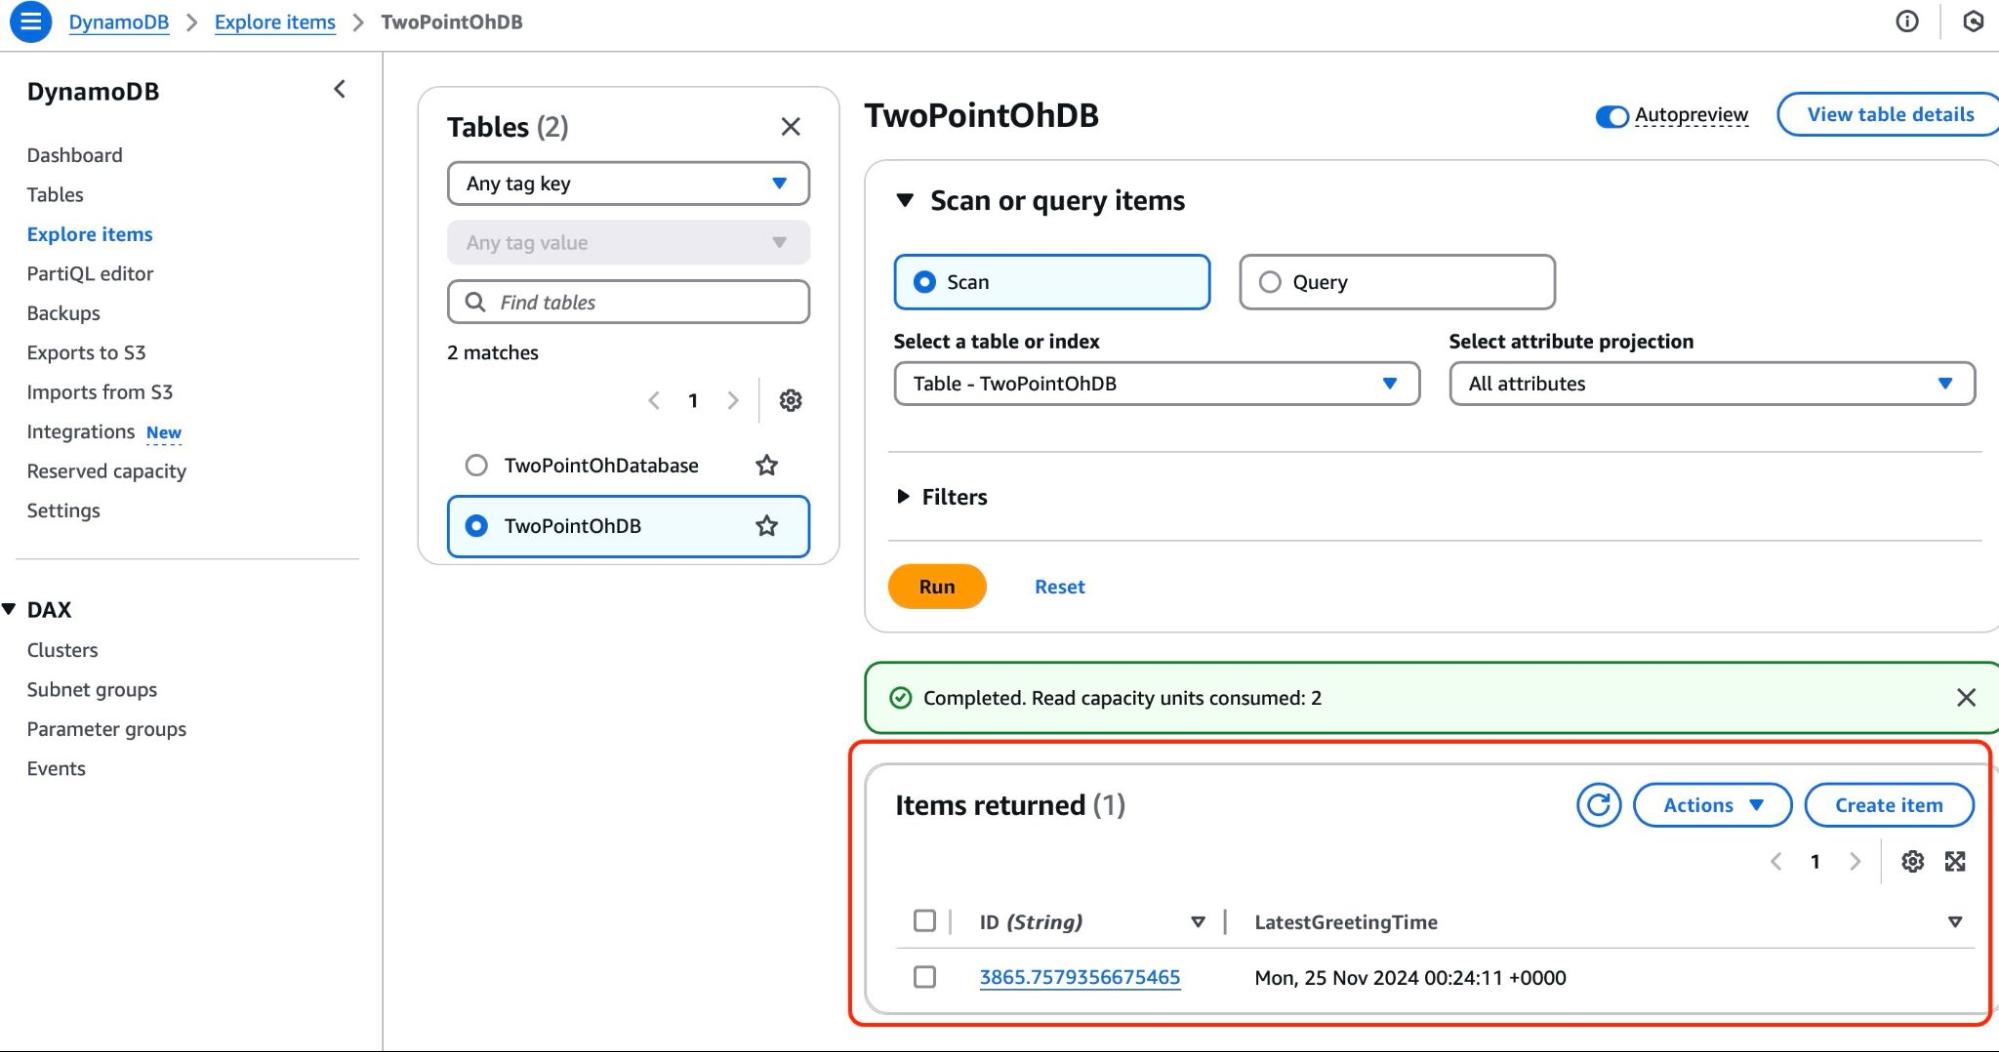
It worked! The data saved successfully in the DynamoDB table.
Connect Amplify and the API Gateway
The only thing left to have a proper working app is a connector between Amplify and API Gateway. In your index.html, copy-paste this new updated piece of code:
<!DOCTYPE html>
<html lang="en">
<head>
<meta charset="UTF-8">
<meta name="viewport" content="width=device-width, initial-scale=1.0">
<title>Two Point Oh!</title>
<style>
body {
margin: 0;
font-family: 'Arial', sans-serif;
background-color: #FFFFFF;
color: #000000;
display: flex;
flex-direction: column;
min-height: 100vh;
}
header {
text-align: center;
padding: 20px;
background-color: #0056D2;
color: #FFFFFF;
}
header h1 {
margin: 0;
font-size: 2rem;
}
header p {
margin-top: 10px;
font-size: 1rem;
}
main {
flex: 1;
display: flex;
justify-content: center;
align-items: center;
padding: 20px;
}
.form-container {
max-width: 500px;
width: 100%;
background-color: #F8F9FA;
padding: 20px;
border-radius: 8px;
box-shadow: 0 4px 6px rgba(0, 0, 0, 0.1);
text-align: center;
}
.form-container label {
display: block;
margin-top: 10px;
font-size: 1rem;
color: #333333;
}
.form-container input {
width: calc(100% - 20px);
padding: 10px;
margin-top: 5px;
font-size: 1rem;
border: 1px solid #CCCCCC;
border-radius: 4px;
color: #333333;
background-color: #FFFFFF;
}
.form-container button {
width: 100%;
margin-top: 20px;
padding: 10px;
font-size: 1rem;
background-color: #0056D2;
color: #FFFFFF;
border: none;
border-radius: 4px;
cursor: pointer;
transition: background-color 0.3s ease;
}
.form-container button:hover {
background-color: #003C99;
}
#result {
margin-top: 20px;
font-size: 1.2rem;
color: #0056D2;
}
footer {
text-align: center;
padding: 10px;
background-color: #0056D2;
color: #FFFFFF;
font-size: 0.9rem;
}
@media (max-width: 768px) {
header h1 {
font-size: 1.5rem;
}
header p {
font-size: 0.9rem;
}
.form-container {
padding: 15px;
}
.form-container button {
font-size: 0.9rem;
}
footer {
font-size: 0.8rem;
}
}
</style>
<script>
const callAPI = (lat1, lon1, lat2, lon2) => {
if (!lat1 || !lon1 || !lat2 || !lon2) {
document.getElementById('result').innerText = "Please fill in all fields.";
return;
}
const headers = new Headers({ "Content-Type": "application/json" });
const body = JSON.stringify({ lat1, lon1, lat2, lon2 });
fetch("YOUR API GATEWAY ENDPOINT", {
method: 'POST',
headers,
body,
})
.then(response => response.text())
.then(result => {
const parsedResult = JSON.parse(result).body;
document.getElementById('result').innerText = `Distance: ${parsedResult} km`;
})
.catch(error => {
document.getElementById('result').innerText = "Error calculating distance. Please try again.";
console.error(error);
});
};
</script>
</head>
<body>
<header>
<h1>Two Point Oh!</h1>
<p>Calculate the distance between two points using their latitude and longitude.</p>
</header>
<main>
<div class="form-container">
<label for="lat1">Latitude 1:</label>
<input type="text" id="lat1" placeholder="Enter Latitude 1">
<label for="lon1">Longitude 1:</label>
<input type="text" id="lon1" placeholder="Enter Longitude 1">
<label for="lat2">Latitude 2:</label>
<input type="text" id="lat2" placeholder="Enter Latitude 2">
<label for="lon2">Longitude 2:</label>
<input type="text" id="lon2" placeholder="Enter Longitude 2">
<button type="button" onclick="callAPI(
document.getElementById('lat1').value,
document.getElementById('lon1').value,
document.getElementById('lat2').value,
document.getElementById('lon2').value
)">Calculate</button>
<div id="result"></div>
</div>
</main>
<footer>
© 2024 Two Point Oh! All rights reserved.
</footer>
</body>
</html>
The following occurs in this block of code:
- There is a form to accept the user input and a button calculate that when the user clicks it, the four values are interpreted with the callAPI method
- The callAPI method will take the latitude and longitude numbers as parameters and send your request using your API Gateway endpoint which should be replaced in the parenthesis of the fetch method
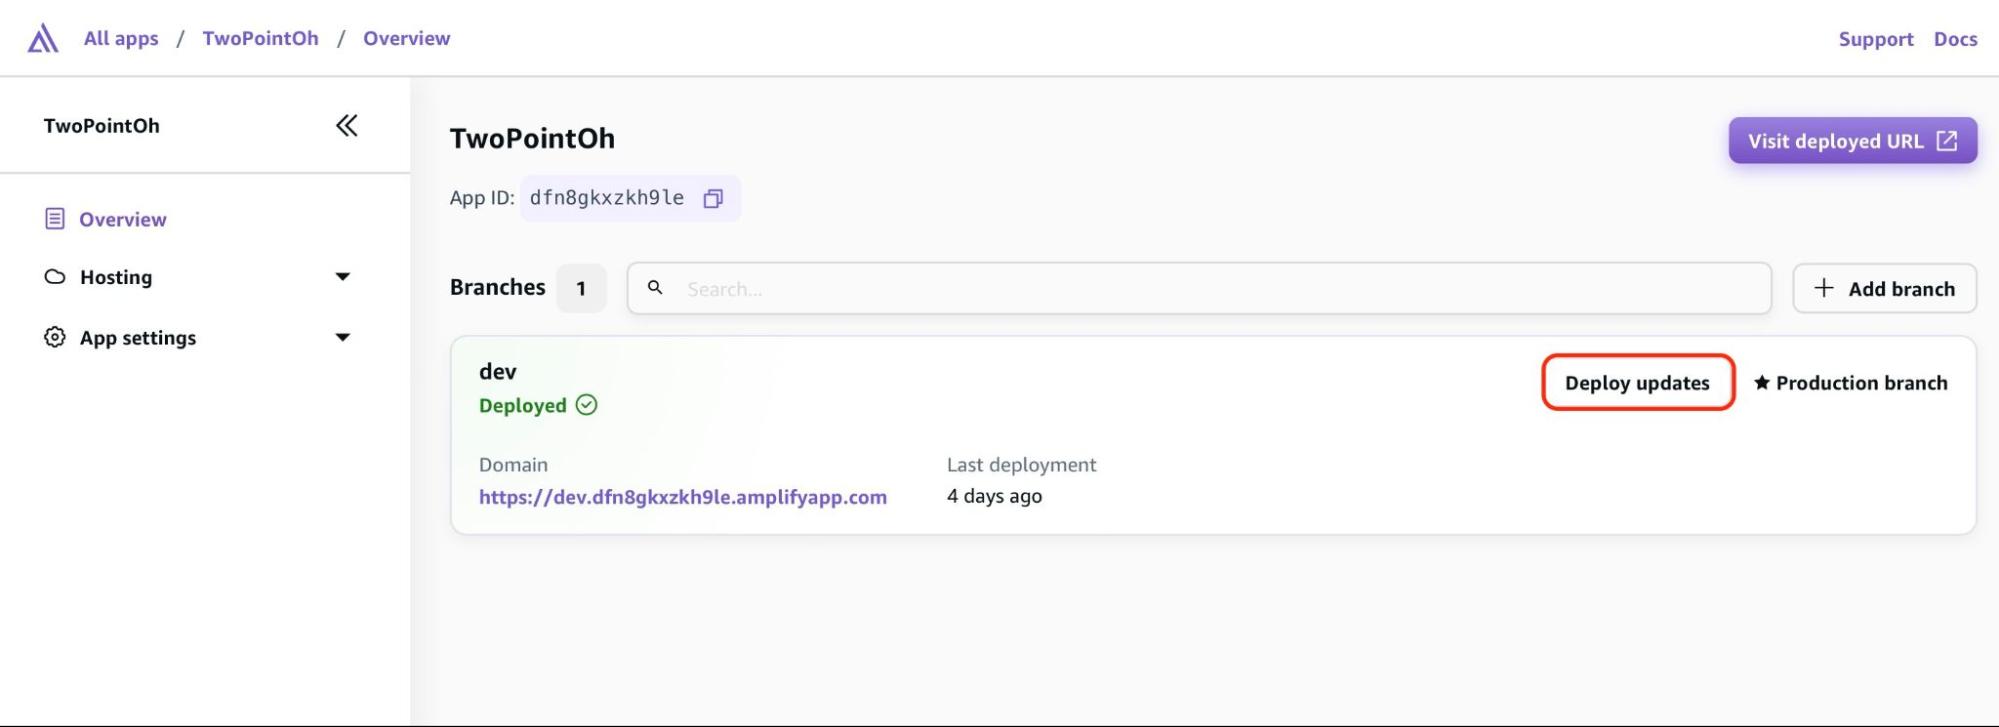
With this complete, zip the index.html again and head to your Amplify console to drag and drop the updated file to redeploy the existing app by clicking on the Deploy updates button.
For the complete source code, check out the GitHub repository.
Wrapping Up
In conclusion, AWS is a complete suite for delivering outstanding applications that make a difference in how you approach development. Using the combination of all these AWS services in one project, you are guaranteed continuous integration and continuous delivery or deployment without downtime when it matters most because of its infrastructure and cloud computing capabilities.
Whatever you do as a developer or an enterprise solution, AWS scales and manages your work efficiently from initialization to deployment without the hassle of managing your infrastructure.